
How to Use a Passive Buzzer with ESP32-S3 Super Mini Using LEDC PWM
Learn how to control a passive buzzer with the ESP32-S3 Super Mini using the LEDC PWM functions. Includes wiring, code examples, and a visual melody sequencer workflow.
If you’ve worked with Arduino before, you might be used to dropping in a tone() function to get a buzzer playing sounds in no time. But if you're using an ESP32, especially the ESP32-S3 Super Mini, things work a bit differently.
Before diving in, it’s worth understanding the type of buzzer you're using:
- Passive buzzers require a PWM signal to generate sound. You control the frequency and duration to create different tones.
- Active buzzers, on the other hand, just need a HIGH signal—they handle the tone generation internally and simply beep when powered.
In this project, we’re using a passive buzzer, which gives us more control over the sound, like generating melodies or dynamic alerts. The catch? The ESP32 doesn’t support the Arduino tone() function natively. That’s where the LEDC PWM hardware comes in—it lets us generate frequencies on any GPIO, perfect for driving a passive buzzer.
Hardware Requirements #
Here’s what you’ll need for this setup:
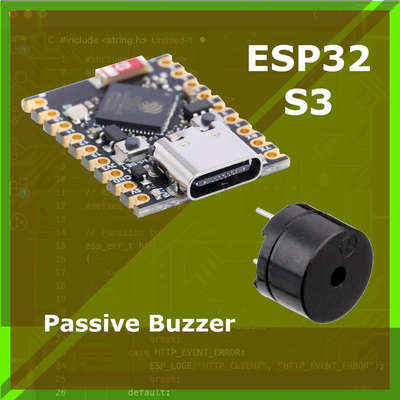
- ESP32 Board

Any board should work, but we are using the ESP32-S3 SuperMinifor this tutorial.


- Passive Buzzer

Just the component: Ideal if you prefer a lower-profile setup and want full control over how it’s wired. Alternatively, you can use a passive buzzer module like the KY-006 if you prefer a plug-and-play option.
- Breadboard and Jumper Wires (optional but helpful)

Great for quick testing and making clean connections without soldering.
Optional #
100Ω Resistor

If your buzzer is loud, this can help reduce volume slightly by limiting current.
Either way, passive buzzers give you full control of pitch and timing—perfect for sound effects or basic melodies.
Wiring the Circuit #
Wiring a passive buzzer to the ESP32-S3 is straightforward. The only requirement is that you connect it to a GPIO capable of PWM output—which is practically any GPIO on the ESP32-S3.
Here’s a simple setup:
Buzzer to ESP32-S3 Super Mini #
| Passive Buzzer Pin | Connects To |
|---|---|
| Positive (+) / SIG | GPIO13 (or any PWM GPIO) |
| Negative (–) | GND |
If you're using the raw passive buzzer (not a module), you can optionally put a 100Ω resistor in series with the positive lead to limit current.
Power Notes: #
- Passive buzzers don't draw much current, so powering directly from the ESP32's 3.3V or 5V pin is fine.
- Most passive buzzers are fine at 3.3V, but check yours—some prefer 5V for louder output.
Fritzing-style Diagram #

You can pick any available PWM-capable GPIO — GPIO13 is used in our examples, but you could just as easily use GPIOs like 5, 18, 21, etc.
Once wired, you're ready to drive the buzzer with code!
Software Setup #
If you're using the Arduino IDE, make sure your environment is ready for ESP32 development:
Select the Right Board
- Go to Tools > Board and choose
ESP32S3 Dev Module(since the ESP32-S3 Super Mini is not listed by name but is compatible).
- Go to Tools > Board and choose
Select Port
- Plug in your board via USB.
- Go to Tools > Port and select the one labeled
ESP32-S3or similar.
Why tone() Doesn't Work on ESP32 #
The traditional Arduino tone() function isn’t supported on ESP32. That's because the ESP32 Arduino core doesn't include the same AVR-based tone implementation. Instead, ESP32 has a more advanced PWM peripheral known as LEDC (LED Control).
Attempting to use the tone() function on an ESP32 often leads to unexpected behavior. While invoking tone() within the setup() function might work without immediate issues, calling it within the loop() can result in runtime errors. One common error observed in the Serial Monitor is:
E (XYZ) ledcWrite: LEDC channel not attached
To generate sound from a passive buzzer with ESP32, you need to:
- Use
ledcSetup()to configure the PWM channel - Use
ledcAttachPin()to link the channel to a GPIO - Use
ledcWriteTone()to output a frequency on that pin
This gives you full control over tone frequency and timing, and it works beautifully with passive buzzers.
Code Example Using ledcWriteTone() #
Here’s a basic example that sets up the LEDC peripheral and plays a short beep:
// Define GPIO and channel
const int buzzerPin = 13;     // GPIO13 (can be any PWM-capable GPIO)
const int ledcChannel = 0;    // One of 0–15
const int resolution = 8;     // 8-bit resolution

void setup() {
  // Configure PWM channel
  ledcSetup(ledcChannel, 2000, resolution);  // 2kHz tone, 8-bit resolution
  ledcAttachPin(buzzerPin, ledcChannel);
}

void loop() {
    // Play a tone
    ledcWriteTone(ledcChannel, 1000);  // Play 1kHz tone
    delay(500);                        // Beep duration
    ledcWriteTone(ledcChannel, 0);     // Stop sound
    delay(1000);
}
This example sets up GPIO13 to output a 1kHz tone for half a second every 1.5 seconds. It's critical to call ledcAttachPin() before using ledcWriteTone() — otherwise, you'll see the runtime error.
Example: Play Simple Melody #
To take things up a notch, you can play a short melody by looping through an array of frequencies and durations. Each note's frequency maps to a musical pitch (e.g., 262 Hz = Middle C), and we’ll use ledcWriteTone() to output them one after another.
Here’s a basic example:
const int buzzerPin = 10;
const int ledcChannel = 0;
const int resolution = 8;

int melody[] = { 262, 294, 330, 349, 392, 440, 494, 523 };  // C D E F G A B C
int noteDurations[] = { 4, 4, 4, 4, 4, 4, 4, 4 };           // quarter notes

void setup() {
  ledcSetup(ledcChannel, 2000, resolution);
  ledcAttachPin(buzzerPin, ledcChannel);
}

void loop() {
  for (int i = 0; i < 8; i++) {
    int noteDuration = 1000 / noteDurations[i];
    ledcWriteTone(ledcChannel, melody[i]);
    delay(noteDuration);
    ledcWriteTone(ledcChannel, 0); // Stop tone
    delay(50); // short pause between notes
  }

  delay(2000); // Wait before repeating melody
}
Bonus: 🎶 Online Buzzer Sequence Generator Tool for ESP32 #
If you want to design your melody visually and hear it before uploading, check out the 🎶 Online Buzzer Sequence Generator Tool for ESP32.
With this tool, you can:
- Select notes from a piano-style grid in a timeline
- Adjust tempo, pitch, and note length
- Preview melodies in your browser using Web Audio
- Export directly as
melody[]andnoteDurations[]arrays for ESP32 - Load existing code arrays to edit and remix melodies visually
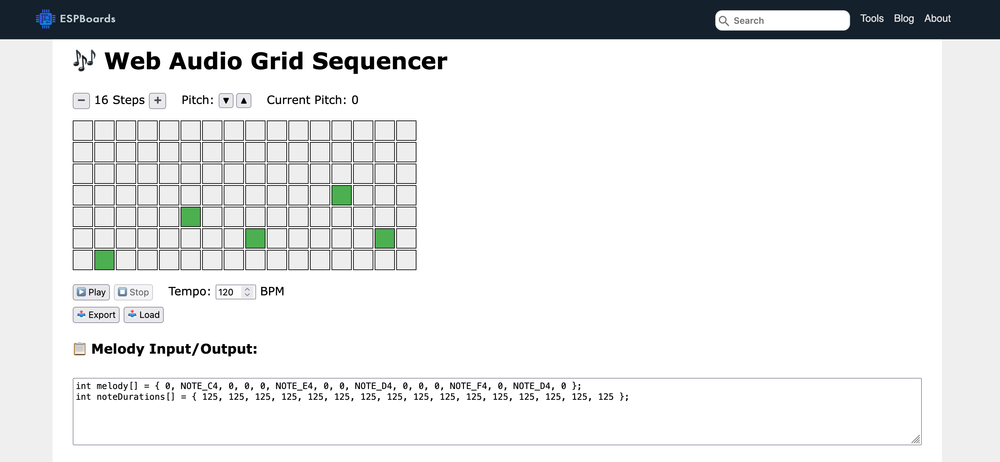
This workflow makes it incredibly fast and fun to experiment with tunes, test how they sound, and then drop the generated code into your ESP32 sketch—no guesswork or re-flashing required for every tweak.
Wrapping Up #
Passive buzzers give you full control over tone generation, but with the ESP32, that control comes from the LEDC peripheral, not the standard tone() function. By using ledcWriteTone(), you can produce stable frequencies across any PWM-capable GPIO, giving you flexibility and accuracy.
If you're working in the Arduino environment, this is your go-to method. But if you’re building more advanced audio features:
- In ESP-IDF, you can use
ledc_timer_config()andledc_channel_config()for low-level PWM control. - For more complex waveforms or audio playback, consider using an external DAC or even the I2S interface for higher-quality sound.
That said, for simple melodies, beeps, and tones—LEDC + a passive buzzer is a great combo.