
Elecrow CrowPanel ESP32 Display Boards Review: 2.8" vs 7.0" Comparison, Features & Testing
The Elecrow CrowPanel ESP32 Display Boards with a detailed comparison of the different models. Explore features, performance, and quick start with CrowPanel
Today we are going to review ESP32 Display Boards with Touchscreen by Elecrow - the Crowpanel. Elecrow is a company that specializes in providing electronic components, modules, and development boards in the field of electronics. They offer a wide range of products, including ESP32 and Raspberry Pi accessories, sensors, actuators, displays, and more.
Electrow kindly sent us two models - one with 2.8" and another with 7" screen, from their "Elecrow CrowPanel Display HMI" Series, which we are going to review. But first, lets take a look at the series offerings.
CrowPanel Display HMI Series #
The "CrowPanel Display HMI" is a human-machine interface (HMI) device offered by Elecrow. HMIs are commonly used in industrial and automation settings to facilitate interaction between humans and machines. They typically feature touchscreens or other input methods for users to control and monitor processes.
The CrowPanel ESP32 Displays are usually equipped with ESP32-WROOM-32 or ESP32-S3-WROOM-1 microcontroller, which ensure seamless operation with the dual-core 32-bit LX6 microprocessor.

Elecrow 7 Inch Display ESP32 Board
Where to Buy:
Prices may vary. Click to check current pricing:
Each CrowDisplay module features a high-resolution LCD display, in a range of screen sizes including 2.4, 2.8, 3.5, 4.3, 5.0, and 7.0 inches, delivering crisp visuals and enhanced user experience. Together with full compatibility with the LVGL graphics library, it allows seamless UI customization, allowing to create modern, engaging and visually appealing interfaces.

Elecrow 2.8 Inch Display ES32 Board
Where to Buy:
Prices may vary. Click to check current pricing:
Additionally, utilizing capacitive touch technology, CrowDisplay modules offer responsive and intuitive touch interfaces, enhancing user interaction. The inclusion of expansion options such as TF card slots, multiple peripheral interfaces, USB interfaces, speaker interfaces, and battery interfaces enables customization and integration with various peripherals and accessories.
CrowPanel Displays Comparison #
The table below compares various specifications of CrowDisplay modules across different sizes, focusing on both their differences and similarities:
| Size | 2.4" | 2.8" | 3.5" | 4.3" | 5.0" | 7.0" |
|---|---|---|---|---|---|---|
| Resolution | 320*240 | 320*240 | 480*320 | 480*272 | 800*480 | 800*480 |
| Touch Type | Resistive Touch | Resistive Touch | Resistive Touch | Resistive Touch | Capacitive Touch | Capacitive Touch |
| Microcontroller | ESP32-WROOM-32-N4 | ESP32-WROOM-32-N4 | ESP32-WROOVER-B | ESP32-S3-WROOM-1-N4R2 | ESP32-S3-WROOM-1-N4R8 | ESP32-S3-WROOM-1-N4R8 |
| Frequency | 240MHz | 240MHz | 240MHz | 240MHz | 240MHz | 240MHz |
| Flash | 4MB | 4MB | 4MB | 4MB | 4MB | 4MB |
| SRAM | 520KB | 520KB | 520KB | 512KB | 512KB | 512KB |
| ROM | 448KB | 448KB | 448KB | 384KB | 384KB | 384KB |
| PSRAM | / | / | 8MB | 2MB | 8MB | 8MB |
| Display Driver | ILI9341V | ILI9341V | ILI9488 | NV3047 | IL16122 + IL15960 | EK9716BD3 + EK73002ACGB |
| Interfaces | 1xUART0, 1xUART1, 1xI2C, 1xGPIO, 1xBattery | 1xUART0, 1xUART1, 1xI2C, 1xGPIO,1xBattery | 2xUART0, 1xI2C, 1xGPIO, 1xBattery | 1xUART0, 2xUART1, 2xGPIO, 1xBattery | 2xUART0, 2xGPIO, 2xI2C, 1xBattery | 2xUART0, 2xGPIO, 2xI2C, 1xBattery |
| Speaker Jack | YES | YES | YES | YES | YES | YES |
| TF Card Slot | YES | YES | YES | YES | YES | YES |
| Size | 36.72 x 48.96mm | 43.2 x 57.6mm | 48.96 x 73.44mm | 95.04 x 53.8mm | 108 x 64.8mm | 153.84 x 85.63mm |
Size: The CrowDisplay modules are available in sizes ranging from 2.4" to 7.0", catering to different application needs and screen space requirements.
Resolution: Each module offers a different resolution, with higher-resolution displays available in larger sizes. For instance, the 7.0" module boasts an 800x480 resolution, providing sharper and more detailed visuals compared to smaller modules.
Touch Type: While all modules support touch input, there is a difference in touch technology used. The smaller modules (2.4", 2.8", 3.5") utilize resistive touch technology, whereas the larger modules (5.0", 7.0") feature capacitive touch technology, offering more responsive and precise touch input.
Microcontroller: The modules are powered by different microcontrollers, with variations such as ESP32-WROOM-32-N4 and ESP32-S3-WROOM-1-N4R8. Despite the differences in microcontrollers, all modules operate at a frequency of 240MHz, ensuring consistent performance across the board.
Memory: There are slight variations in memory specifications, including flash, SRAM, ROM, and PSRAM. However, all modules offer sufficient memory to support their respective functionalities and applications.
Display Driver: Each module utilizes a specific display driver, tailored to optimize performance and compatibility with the corresponding screen size and resolution.
Interfaces: The number and types of interfaces available on each module may vary. Larger modules typically offer more interfaces, accommodating additional peripherals and accessories.
Speaker Jack and TF Card Slot: These features are consistent across all modules, providing users with options for audio output and external storage expansion.
Size: The physical dimensions of each module vary, with larger modules naturally being larger in size to accommodate their respective screen sizes.
Overall, while there are differences in resolution, touch technology, microcontroller, and size among the CrowDisplay modules, they share common features such as touch support, memory capabilities, and expansion options like speaker jacks and TF card slots. These modules offer flexibility and scalability, allowing users to choose the one that best suits their project requirements.
Programming ESP32 CrowDisplay Modules #
Programming ESP32 CrowDisplay is a breeze, if you already know how to program any ESP32 module. Especially with some modules support for ESPHome. And even though not all modules support ESPHome, with LVGL Tutorials from Elecrow, you will be building great UIs in minutes.
ESPHome #
CrowDisplay modules that comes in these sizes: 2.4 inches, 2.8 inches, and 3.5 inches, each utilizes advanced display drivers such as the ILI9341V and ILI9488. These drivers are not only known for their reliability but they are also compatible with ESPHome! Thanks to this compatibility, integrating CrowDisplay modules into your IoT projects becomes a seamless experience, allowing you to stay in the ESPHome ecosystem for all your ESP32 devices.
LVGL Compatible #
While not all CrowDisplay modules currently support ESPHome, fear not! Each and every CrowDisplay module fully supports LVGL (LittlevGL), a renowned open-source graphics library celebrated for its adaptability and user-friendly interface. With LVGL you're equipped to craft modern user interfaces with responsive touch input, and customizable widgets. With LVGL you can easily design immersive User Interfaces tailored to your project, regardless of the CrowDisplay module size you opt for.
Unboxing Elecrow ESP32 CrowDisplay Modules #
The package was sent from China and both 2.8" and 7" sample modules were securely added separely in to cardboard boxes. Inside, the screens were wrapped into bubble wrap to prevent from any damage, while shipping.

2.8" CrowDisplay ESP32 Module #
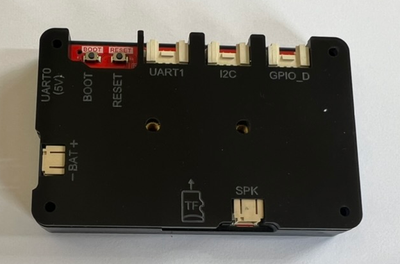
Inside the 2.8 inch CrowDisplay Module box, we find the ESP32 Display module, acrylic case, USB-A to USB-C cable to power and program the module, Grove to 4-pin DuPont cable, which can be used to connect peripherals to I2C, GPIO_D or UART0 sockets on the board and a stylus to interact with the screen.

After assembling the case and mounthing to the board, it looks pretty neat.
7" CrowDisplay ESP32 Module #
Inside the 7 inch CrowDisplay Module box, we find the ESP32 Display Module, with the case mounted already. Additionally, it includes the USB-A to USB-C cable to power and program the module. Also, inside we find one Grove to 4-pin DuPont cable, which can be used to connect peripherals to I2C, GPIO_D or UART0 sockets on the board.

Testing the ESP32 Display Module #
To test out the Elecrow ESP32 Display Module, we're going to upload some example TFT code to the boards. We will use Arduino IDE and TFT_eSPI examples, but if you want a more full example, you can head to the official Elecrow tutorial for 2.8" Board.
But before we dive in to the example with Arduino IDE, there are a few simple steps we need to take in the Arduino IDE to get everything ready:
Go to Settings and find Additional Boards Manager URLs. Add the following URL:
https://espressif.github.io/arduino-esp32/package_esp32_dev_index.jsonOpen the Boards Manager from the menu on the left side. Search for "esp32" and install the esp32 package by Espressif Systems.
Head over to the Libraries section (also in the left menu), search for "TFT_eSPI", and install it - this library is developed by Bodmer.
Now we are ready to load the example code. We will test 2.8" and 7" modules separately.
2.8" Crowpanel ESP32 Display Module #
For the 2.8" Module, we will first try the "TFT_Clock" example from TFT_eSPI library.
Select TFT_Meters example #
- In Arduino IDE, select "File" -> "Examples" -> "TFT_eSPI" -> "320x240" -> "TFT_Clock"
User_Setup Settings for TFT_eSPI Library - Elecrow 2.8" ESP32 Board #
Before we upload the code, we need to provide custom settings for the TFT_eSPI library.
- Save the Arduino Example Project
In Arduino IDE, Click "File" -> "Save As..." and save the project on your computer in a selected directory.
- Create tft_setup.h Settings File
In the same folder, where you saved the example project, create additional file called tft_setup.h
- Fill in the tft_setup.h Settings
Copy and paste the code below into the newly created tft_setup.h file.
// ##################################################################################
//
// Section 1. Call up the right driver file and any options for it
//
// ##################################################################################

#define ILI9341_DRIVER // Generic driver for common displays
#define TFT_WIDTH  320
#define TFT_HEIGHT 240

// ##################################################################################
//
// Section 2. Define the pins that are used to interface with the display here
//
// ##################################################################################

#define TFT_BACKLIGHT_ON HIGH // Level to turn ON back-light (HIGH or LOW)
#define TFT_BL   27 // LED back-light
#define TFT_MISO 12
#define TFT_MOSI 13
#define TFT_SCLK 14
#define TFT_CS   15
#define TFT_DC    2
#define TFT_RST  -1
#define TOUCH_CS 33

// ##################################################################################
//
// Section 3. Define the fonts that are to be used here
//
// ##################################################################################

// Comment out the #defines below with // to stop that font being loaded
// The ESP8366 and ESP32 have plenty of memory so commenting out fonts is not
// normally necessary. If all fonts are loaded the extra FLASH space required is
// about 17Kbytes. To save FLASH space only enable the fonts you need!

#define LOAD_GLCD   // Font 1. Original Adafruit 8 pixel font needs ~1820 bytes in FLASH
#define LOAD_FONT2  // Font 2. Small 16 pixel high font, needs ~3534 bytes in FLASH, 96 characters
#define LOAD_FONT4  // Font 4. Medium 26 pixel high font, needs ~5848 bytes in FLASH, 96 characters
#define LOAD_FONT6  // Font 6. Large 48 pixel font, needs ~2666 bytes in FLASH, only characters 1234567890:-.apm
#define LOAD_FONT7  // Font 7. 7 segment 48 pixel font, needs ~2438 bytes in FLASH, only characters 1234567890:-.
#define LOAD_FONT8  // Font 8. Large 75 pixel font needs ~3256 bytes in FLASH, only characters 1234567890:-.
#define LOAD_GFXFF  // FreeFonts. Include access to the 48 Adafruit_GFX free fonts FF1 to FF48 and custom fonts

// Comment out the #define below to stop the SPIFFS filing system and smooth font code being loaded
// this will save ~20kbytes of FLASH
#define SMOOTH_FONT

// ##################################################################################
//
// Section 4. Other options
//
// ##################################################################################

// Define the SPI clock frequency, this affects the graphics rendering speed. Too
// fast and the TFT driver will not keep up and display corruption appears.

#define SPI_FREQUENCY        27000000
#define SPI_TOUCH_FREQUENCY   2500000
#define SPI_READ_FREQUENCY   16000000
Upload Code to the Elecrow ESP32 Board #
- Select "Tools" -> "Board" -> "esp32" -> "ESP32-WROOM-DA Module"
- Select "Tools" -> "Port" -> Select the port of your Elecrow Panel
- Select "Sketch" -> "Upload"


After some time, the code should compile and upload to the board. And shortly you will see the display turn-on. On the left image you can see the TFT Clock example, while on the right image it is the custom text example, both running on Elecrow ESP32 2.8" Board.
Troubleshooting #
In case when trying to upload the TFT_eSPI example code to the Elecrow ESP32 board, you get A fatal error occurred: Unable to verify flash chip connection (Invalid head of packet (0xE0): Possible serial noise or corruption.)., it could be related to the Boad Rate Selected. By default, on Arduino IDE, Boad Rate of 921600 is selected.
If you encounter problems, try to lower the Boad Rate to 115200:
- Select Tools -> Upload Speed -> 115200
- Re-upload the program.
If you are still unable to upload the program, make sure the cable you use supports data transfer. Some of the USB-C cables are Power Only!
7" Crowpanel ESP32 Display Module #
I tried plugging in the power for the 7" module and it has an example project uploaded. It supports touch screen and provides a user panel with different settings. You can see how it looks like in the picture.

Unfortunatelly, the TFT_eSPI library does not support the 7" Elecrow Display Board. To use the Display for 7 inch crowpanel, you would need to use the LovyanGFX library or full LVGL style as can be found in ESP32 Display 7.0 inch HMI Arduino Tutorial by Elecrow.
This is a bit too much for this post, but we will walk through how to use the 7" board in upcoming posts. Stay tuned!
Other Elecrow Crowpanel ESP 32 Display Board sizes #
There are quite a few other options like 2.4", 3.5", 4.3", 5.0" apart the already mentioned 2.8" and 7.0" Elecrow HMI Boards. You can find a separate wiki for each model in the Elecrow CrowPanel Wiki.
The 2.4", 2.8", and 3.5" models of the Elecrow ESP32 Display Module support the TFT_eSPI library, which makes them super easy to work with. Just install the library, and you're good to go!
However, if you're working with other display models, you'll need to use the lvgl library instead. It’s a bit more advanced but offers a lot of flexibility for creating beautiful interfaces.
Conclusion #
In conclusion, both the 2.8" and 7.0" Elecrow CrowPanel ESP32 Display Boards offer impressive functionality, each serving different needs depending on your project. The 2.8" model is compact and easy to use, especially with the TFT_eSPI library, making it perfect for smaller projects where space is key. On the other hand, the 7.0" model shines when you need more screen real estate and a richer user interface, although it requires lvgl for more complex designs.
Both boards performed well in testing, and Elecrow has definitely made it easy to get up and running quickly and I see myself using these a lot in my future projects.