Send Messages on WhatsApp Using the WhatsApp API with ESP32
Discover how to send messages on WhatsApp using the WhatsApp API with ESP32. Send WhatsApp messages, alerts, and notifications. Tutorial and code examples.
When working with an ESP32, one incredibly useful feature is the ability to send messages on WhatsApp whenever certain events happen in your projects. Whether you're monitoring sensors, tracking data, or automating alerts, being able to send a message in WhatsApp directly from the ESP32 can take your project to the next level.
In this post, we will walk through how to use the WhatsApp API to send messages from your ESP32. From setting up the API to coding your ESP32 to send WhatsApp messages from the API, we will learn everything needed to know about using the WhatsApp API. Whether you're sending notifications, alerts, or custom updates, you'll soon be able to send message with WhatsApp from your ESP32 device with ease.
Requirements #
To get started with using the WhatsApp API to send messages from your ESP32, there are a couple of important steps you’ll need to follow:
Meta Business Account: First, you’ll need to set up a Meta Business Account, which is crucial for accessing the WhatsApp API to send messages. Head over to Meta's Business Portal to create your account. This is where you’ll manage all the essentials, including the ability to send messages on WhatsApp from your projects. For a detailed guide on registering your account, check out this resource.
Meta Business App: Once your account is ready, you’ll need to create a Meta Business App. This app connects your ESP32 with the WhatsApp API, allowing you to send a message in WhatsApp directly from your devices. This is key for sending WhatsApp messages from the API and handling things like WhatsApp alert messages. You can create your app by following the steps here.
Create a Meta Business Account #
If you don’t have a Meta Business Account yet, don’t worry - it’s easy to set up. Simply head over to Meta for Developers and follow the steps to create your account. This account is necessary to access the WhatsApp API to send messages from your ESP32.
Detailed instructions on how to register your Meta Business Account, you can find here.
Create a Meta Business App #
Once you’ve created your Meta Business Account, the next step is to create a Meta Business App, which will allow you to connect your ESP32 with the WhatsApp API to send messages. Here’s how you do it:
Login to developers.facebook.com using the credentials from your Meta Business Account.
In the top-right corner of the page, click on “My Apps”.
Select “Create App” to start the process.
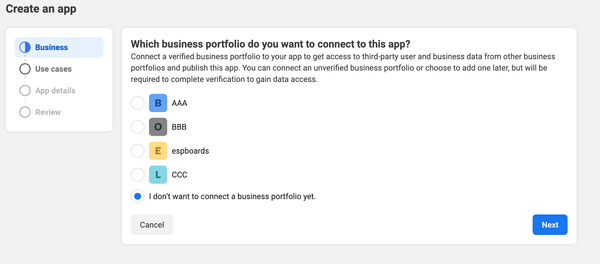
Business #
If you already have a business profile on Facebook, you can choose which business portfolio to to connect the app to. This is especially useful for organizing apps under a specific business.
If you don’t have a business profile, no worries! Just select “I don’t want to connect a business portfolio yet.”
After your app is created, you’ll be ready to configure it for sending WhatsApp messages from the API.
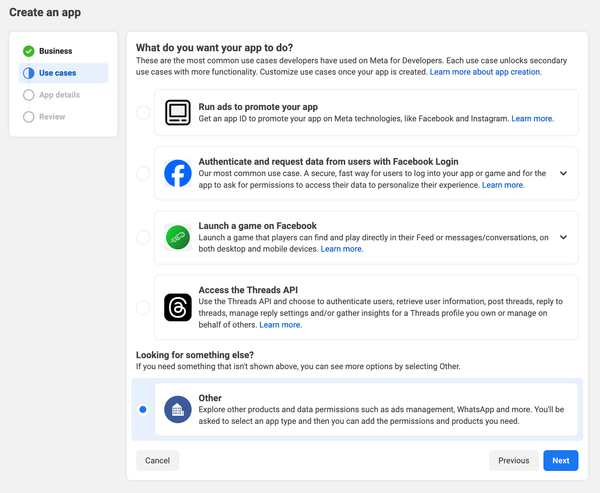
Use Cases #
When prompted with "What do you want your app to do?", select “Other” from the list of options.
This option is needed for projects where you're integrating the WhatsApp API to send messages from devices like the ESP32.
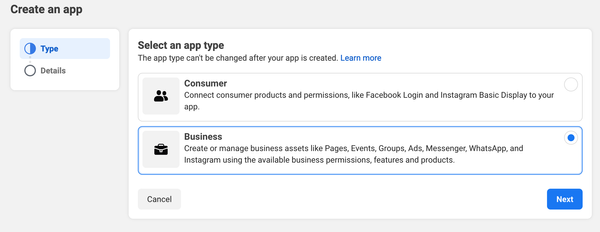
What do ou want your app to do? #
Under App Type, select “Business”.
This is essential because choosing the Business type gives you access to the WhatsApp API, allowing you to send messages on WhatsApp from your ESP32.
Finish Creating the App #
On the next page, you’ll need to provide some basic details for your app:
App Name: Enter a unique name for your app that reflects its purpose. This name will help you easily identify the app later on.
App Contact Email: Provide an email address where you can be reached for any issues related to the app.
Business Portfolio: If you have a business portfolio you want to connect, make sure to select it here. If you’re unsure, you can skip this step for now.
Setup WhatsApp Integration #
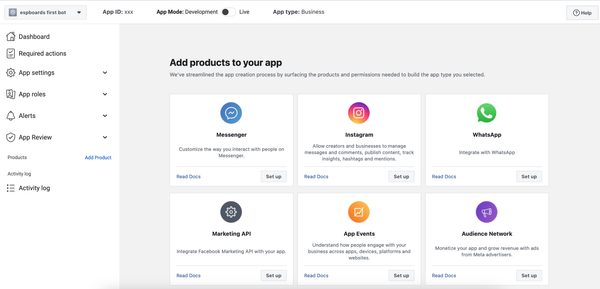
After you click on “Create App,” you’ll be taken to your app’s dashboard.
Look for the “WhatsApp” option in the left-hand menu. Next to it, you’ll see a “Set Up” button. Click on “Set Up” to start configuring the WhatsApp API for your app.
Start Using the API #
Once you’ve clicked “Set Up” for WhatsApp, you’ll see the option to “Start using the API.” Here’s what to do next:
Click on “Start using the API” to access your testing features. You’ll receive a Test Business Number that allows you to begin experimenting with the WhatsApp API.
Keep in mind that this test number can be used to send messages on WhatsApp to a maximum of 5 recipients. Additionally, it has a limit of 250 new conversations per day.
This test number is perfect for getting started with basic functionality, and for most testing scenarios, it will be sufficient. However, if you need to increase these limits, you can connect a real phone number to your business account later on. For now, enjoy exploring how to send messages in WhatsApp using your test number!
Generate Access Token #
To interact with the WhatsApp API from your ESP32, the next step is to generate your access token.
Click on “Generate Access Token” to create a token that will allow your app to authenticate and send messages.
This access token is crucial for sending messages on WhatsApp using the WhatsApp API to send messages. Keep it secure, as it grants your ESP32 permission to send messages from WhatsApp.
After clicking “Generate Access Token”, a popup will prompt you to log in to your Facebook account.
Log in using your Facebook credentials associated with your Meta Business Account.
In the popup, you’ll see an option that says “Opt in to current WhatsApp Accounts only.” I recommend selecting this option to ensure that you’re working with your test number.
Preparing to Send the Message #
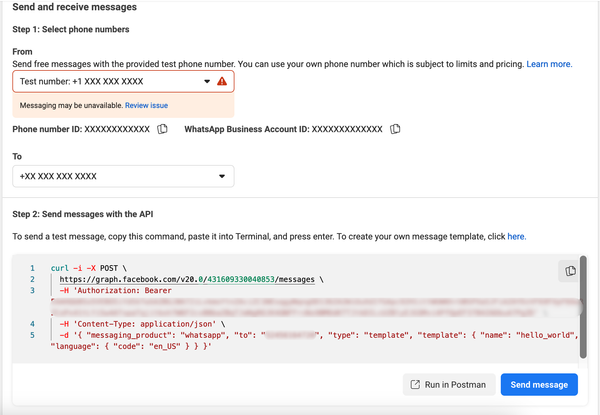
Once you have your access token, it’s time to set up the phone number for sending messages:
- From: Select your Test Business Number from the list.
- To: Click on “Manage phone number list”. Here, you can add your personal phone number to receive test messages.
After adding your phone number, you’ll receive a message on WhatsApp with a verification code. Make sure to check your WhatsApp for this code and enter it on the website.
After verification, select your phone number in the To field.
Sending the Test WhatsApp Message #
Once your phone number is verified, you’ll see a cURL request generated below.
You can either copy the cURL request provided and run it in your terminal to send the message directly.
Alternatively, you can simply click the “Send Message” button to test sending your first WhatsApp message.
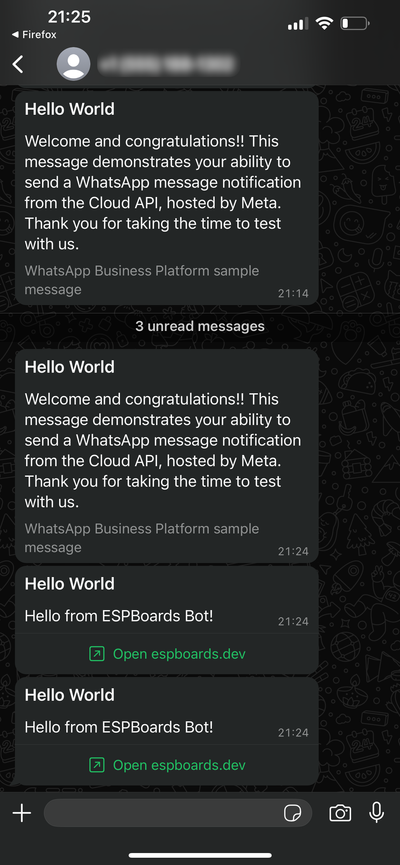
If successful, you should receive the test message shortly on the selected WhatsApp number. This is an exciting moment, as it confirms that your integration with the WhatsApp API is functioning as intended!
Customizing WhatsApp Message #
If you want to customize the test message you’re sending, you’ll need to create a new message template on the Meta Business platform.
- Go to the Meta Business Manager and navigate to the WhatsApp Manager section.
- Click on “Create Template” to start the process of adding a new message template.
- When prompted, enter a name for your template. For example, we use “statement_available_2”.
Creating a new template allows you to personalize the content of your WhatsApp messages and ensures that your communications are tailored to your specific needs. Once your template is created, you can use it to send messages to WhatsApp.
Now that you’ve created your message template, you’ll need to update the cURL request to use your new template.
In the cURL request, change template.name to the name of your template, for example, “statement_available_2.”
curl -i -X POST \
  https://graph.facebook.com/v20.0/431609330040853/messages \
  -H 'Authorization: Bearer ACCESS_TOKEN' \
  -H 'Content-Type: application/json' \
  -d '{
        "messaging_product": "whatsapp",
        "to": "xxx",
        "type": "template",
        "template": {
            "name": "statement_available_2",
            "language": { "code": "en_US" }
        }
      }'
Paste this updated cURL request in your terminal, or update the cURL request in your Meta app and click “Send Message” again to test your new template!
You should reveive the message shortly in your WhatsApp.
Generate Permanent Token #
The access token we used before is temporary and will expire in a few hours! Therefore we need to generate a permanent token.
Open Your App Settings #
- Go to Meta Business Suite.
- In the top-left dropdown menu, locate your business account.
- Click on the Settings (gear) icon in the sidebar.
- Under "Users", select "System Users".
Create System User #
- Click the Add button.
- Enter user name
- Choose either Admin or Employee based on the level of access you want to grant. Employee is enough.
- Click Create User.
Assign Assets to the User #
- Select the newly create user.
- Click Assign Assets
- Select your app and assign Full control.
Generate Token #
- Click Generate Token.
- Select the app for which you want to generate the token.
- Set the expiration time for the token as needed.
- Select the necessary permissions, including whatsapp_business_messaging.
- Click on Generate Token.
Copy the Token #
- Once the token is generated, copy it immediately.
- Note it down in a secure place, as you will need it for making API calls.
Make sure to keep your access token secure and never share it publicly!
Using the WhatsApp API to Send Messages from ESP32 #
You can find a full code example in the GitHub Repository.
Create a folder named whatsapp_message. This will be the main Arduino project's directory.
Secrets #
Create secrets.h file in the root project directory. Copy the following code:
#define WIFI_SSID "<REPLACE_WITH_YOUR_WIFI_SSID>"
#define WIFI_PASS "<REPLACE_WITH_YOUR_WIFI_PASSWORD>"
#define WHATSAPP_ACCESS_TOKEN "<REPLACE_WITH_WHATSAPP_ACCESS_TOKEN>"
#define TARGET_PHONE_NUMBER "<REPLACAE_WITH_TARGET_WHATSAPP_NUMBER>"- Fill in your WiFi Credentials in
WIFI_SSIDandWIFI_PASS - Paste the Meta App Access Token you copied earlier in
REPLACE_WITH_WHATSAPP_ACCESS_TOKEN. It should look something like this:AAB2J0Qzxt29kBOxRsqSXysJJQZBkxEb9qiSGy5zOZArtmUVL2dv9abP8z32p7mHZA4bgOofN7g8zyoZBCCJpuG8Pkwnk3NyQ2zfLvJqUs9eKUGKWazWag9eRz6C8b37BVW6L5UVRVIJpeRhfxE2KQhM1kYTKDmHNudxFtl4QZBfHuAtDxRPzaHorse99y7PZAxyNVBKbsNot7JEBkQ4NUiXEPZAnsVMZD
Facebook Graph (WhatsApp API) SSL/TLS Certificate #
Create facebookGraphCert.h file in the root project directory and copy the following code:
/*
 * Get current graph.facebook.com certificate:
 * openssl s_client -showcerts -connect graph.facebook.com:443
 */
const char* FACEBOOK_GRAPH_CERT = R"(
-----BEGIN CERTIFICATE-----
MIIEsTCCA5mgAwIBAgIQBOHnpNxc8vNtwCtCuF0VnzANBgkqhkiG9w0BAQsFADBs
MQswCQYDVQQGEwJVUzEVMBMGA1UEChMMRGlnaUNlcnQgSW5jMRkwFwYDVQQLExB3
d3cuZGlnaWNlcnQuY29tMSswKQYDVQQDEyJEaWdpQ2VydCBIaWdoIEFzc3VyYW5j
ZSBFViBSb290IENBMB4XDTEzMTAyMjEyMDAwMFoXDTI4MTAyMjEyMDAwMFowcDEL
MAkGA1UEBhMCVVMxFTATBgNVBAoTDERpZ2lDZXJ0IEluYzEZMBcGA1UECxMQd3d3
LmRpZ2ljZXJ0LmNvbTEvMC0GA1UEAxMmRGlnaUNlcnQgU0hBMiBIaWdoIEFzc3Vy
YW5jZSBTZXJ2ZXIgQ0EwggEiMA0GCSqGSIb3DQEBAQUAA4IBDwAwggEKAoIBAQC2
4C/CJAbIbQRf1+8KZAayfSImZRauQkCbztyfn3YHPsMwVYcZuU+UDlqUH1VWtMIC
Kq/QmO4LQNfE0DtyyBSe75CxEamu0si4QzrZCwvV1ZX1QK/IHe1NnF9Xt4ZQaJn1
itrSxwUfqJfJ3KSxgoQtxq2lnMcZgqaFD15EWCo3j/018QsIJzJa9buLnqS9UdAn
4t07QjOjBSjEuyjMmqwrIw14xnvmXnG3Sj4I+4G3FhahnSMSTeXXkgisdaScus0X
sh5ENWV/UyU50RwKmmMbGZJ0aAo3wsJSSMs5WqK24V3B3aAguCGikyZvFEohQcft
bZvySC/zA/WiaJJTL17jAgMBAAGjggFJMIIBRTASBgNVHRMBAf8ECDAGAQH/AgEA
MA4GA1UdDwEB/wQEAwIBhjAdBgNVHSUEFjAUBggrBgEFBQcDAQYIKwYBBQUHAwIw
NAYIKwYBBQUHAQEEKDAmMCQGCCsGAQUFBzABhhhodHRwOi8vb2NzcC5kaWdpY2Vy
dC5jb20wSwYDVR0fBEQwQjBAoD6gPIY6aHR0cDovL2NybDQuZGlnaWNlcnQuY29t
L0RpZ2lDZXJ0SGlnaEFzc3VyYW5jZUVWUm9vdENBLmNybDA9BgNVHSAENjA0MDIG
BFUdIAAwKjAoBggrBgEFBQcCARYcaHR0cHM6Ly93d3cuZGlnaWNlcnQuY29tL0NQ
UzAdBgNVHQ4EFgQUUWj/kK8CB3U8zNllZGKiErhZcjswHwYDVR0jBBgwFoAUsT7D
aQP4v0cB1JgmGggC72NkK8MwDQYJKoZIhvcNAQELBQADggEBABiKlYkD5m3fXPwd
aOpKj4PWUS+Na0QWnqxj9dJubISZi6qBcYRb7TROsLd5kinMLYBq8I4g4Xmk/gNH
E+r1hspZcX30BJZr01lYPf7TMSVcGDiEo+afgv2MW5gxTs14nhr9hctJqvIni5ly
/D6q1UEL2tU2ob8cbkdJf17ZSHwD2f2LSaCYJkJA69aSEaRkCldUxPUd1gJea6zu
xICaEnL6VpPX/78whQYwvwt/Tv9XBZ0k7YXDK/umdaisLRbvfXknsuvCnQsH6qqF
0wGjIChBWUMo0oHjqvbsezt3tkBigAVBRQHvFwY+3sAzm2fTYS5yh+Rp/BIAV0Ae
cPUeybQ=
-----END CERTIFICATE-----
)";
Please note this is graph.facebook.com certificate at the time of writing this post. If the certificate is changed in the meantime, you can get a new certificate with this command:
openssl s_client -showcerts -connect graph.facebook.com:443ESP32 Code Example Send WhatsApp Message #
Create whatsapp.h file in the root directory of your project. Copy the following code:
#include <WiFi.h>
#include <WiFiMulti.h>
#include <HTTPClient.h>
#include <WiFiClientSecure.h>
#include "facebookGraphCert.h"

const char ssid[] = WIFI_SSID;
const char pass[] = WIFI_PASS;
const String whatsapp_access_token = WHATSAPP_ACCESS_TOKEN;
const String target_phone_number = TARGET_PHONE_NUMBER;
const String fb_graph_messages_url = "https://graph.facebook.com/v20.0/431609330040853/messages";

WiFiMulti WiFiMulti;

void connectWIFI() {
  WiFi.disconnect(true);
  WiFiMulti.addAP(ssid, pass);
  WiFi.mode(WIFI_STA);
  while ((WiFiMulti.run() != WL_CONNECTED)) {
    Serial.print(".");
  }
  Serial.println("WiFi Connected");
}

void sendWhatsapp() {
  Serial.print("Send whatsapp");
  WiFiClientSecure *client = new WiFiClientSecure;
  if (client) {
    client -> setCACert(FACEBOOK_GRAPH_CERT);
    {
      HTTPClient https;

      if (https.begin(*client, fb_graph_messages_url)) {
        https.addHeader("Content-Type", "application/json");
        https.addHeader("Authorization", "Bearer " + String(WHATSAPP_ACCESS_TOKEN));

        String jsonPayload = "{\"messaging_product\":\"whatsapp\",\"to\":\"" + target_phone_number + "\",\"type\":\"template\",\"template\":{\"name\":\"statement_available_2\",\"language\":{\"code\":\"en_US\"}}}";
        int httpCode = https.POST(jsonPayload);

        if (httpCode > 0) {
          if (httpCode == HTTP_CODE_OK || httpCode == HTTP_CODE_MOVED_PERMANENTLY) {
            String payload = https.getString();
            Serial.print("HTTP Response: ");
            Serial.println(payload);
          }
        } else {
          Serial.print("HTTP Post failed: ");
          Serial.println(https.errorToString(httpCode).c_str());
        }

        https.end();
      }
    }

    delete client;
  }
}
This code provides a function to send WhatsApp message using the API.
The main sendWhatsapp() function sets a Facebook Graph certificate to WiFiClientSecure, sets the WhatsApp message content and finally sends the message to the Whatsapp API.
Send the Messsage from ESP32 to your Discord Channel #
Create whatsapp_message.ino file in the root directory of your project. Add the following code:
#include "secrets.h"
#include "whatsapp.h"

void setup() {
  Serial.begin(9600);
  connectWIFI();
  sendWhatsapp();
}

void loop() {
}
This code snippet is a simple ESP32 program designed to connect to a WiFi network and send a WhatsApp message using the WhatsApp API. Here's a breakdown of its key components:
Libraries:
- #include "secrets.h": This file likely contains sensitive information, such as WiFi credentials and the WhatsApp access token, needed for the connection and API requests.
- #include "whatsapp.h": This may contain function definitions or declarations related to sending WhatsApp messages.
Setup Function:
Serial.begin(9600): Initializes the serial communication at a baud rate of 9600, allowing the ESP32 to send and receive data over the serial monitor.
connectWIFI(): Calls a function to establish a connection to the specified WiFi network using credentials from secrets.h.
sendWhatsapp(): Calls a function that sends a WhatsApp message via the WhatsApp API.
Loop Function:
The loop() function is empty, meaning the program doesn't perform any repetitive tasks after the initial setup. In this context, it could be used for further functionality if needed.
Overall, if you upload this program to your ESP32 board, it will send one mesage to your provided WhatsApp number.
Whatsapp Send to Multiple Numbers with Graph API #
WhatsApp Business Cloud API does not provide an option to send messages to multiple phone numbers at once. If you want to send the same message to multiple contacts, you have to do that one by one or in the loop.
Conclusion #
In this blog post, we explored how to leverage the WhatsApp API to send messages directly from an ESP32. We walked through the steps of setting up your environment, creating necessary configurations, and crafting the appropriate JSON payload to send a WhatsApp message.
By integrating this functionality, you can automate notifications, alerts, or other messages based on specific triggers within your projects. With the ability to customize the message content and recipient phone numbers dynamically, the possibilities are vast.
