STM32 with Arduino IDE - A Beginner-Friendly Approach
Discover how to program STM32 microcontrollers easily using Arduino IDE. Simplify development with step-by-step instructions, from setup to your first project!
The STM32 series of microcontrollers' traditional development environments can be intimidating for beginners due to their complexity and steep learning curve.
However, with the Arduino IDE, programming STM32 becomes significantly more accessible. Arduino’s straightforward interface and extensive library support allow developers of all skill levels to unlock the potential of STM32 microcontrollers without needing to master complex toolchains or low-level coding. In this guide, we’ll show you how to get started with STM32 on the Arduino IDE, making powerful embedded systems development simpler than ever. If you want to read more about Arduino for STM32, check the STM32Duino Forum.
Prerequisites for Programming STM32 with Arduino IDE #
Before diving into programming your STM32 microcontroller using the Arduino IDE, ensure you have the following:
STM32 Microcontroller Board: Examples include STM32F103C8T6 (commonly known as the Blue Pill), STM32F411 (Black Pill), or any compatible STM32 board.
Arduino IDE Installed: Download and install the latest version of the Arduino IDE from the official Arduino website. You can find detailed instructions here.
Install STM32 Boards to Arduino IDE #
To program STM32 microcontrollers using Arduino IDE, you'll first need to install the STM32 boards. Follow these steps to set up your environment:
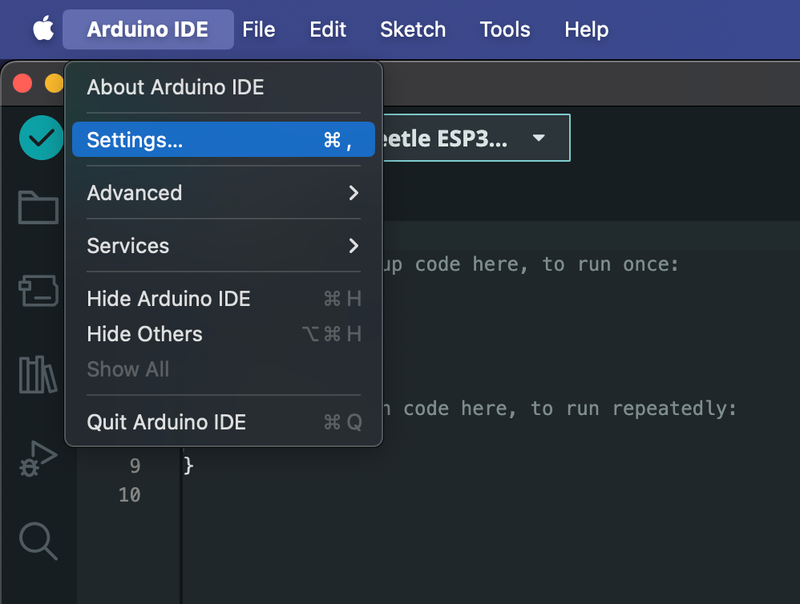
- Open the Arduino IDE. and go to File > Preferences.
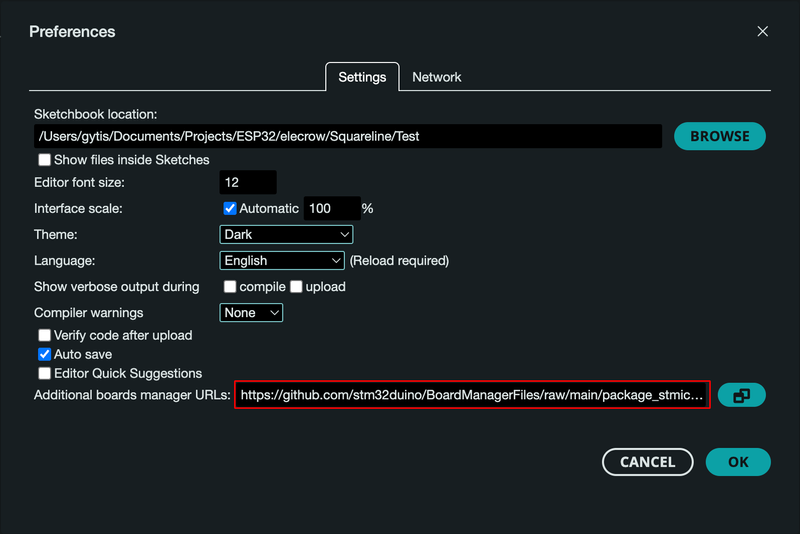
- Find the Additional Boards Manager URLs field and paste the following URL:
https://github.com/stm32duino/BoardManagerFiles/raw/main/package_stmicroelectronics_index.json
Click OK to save the changes.
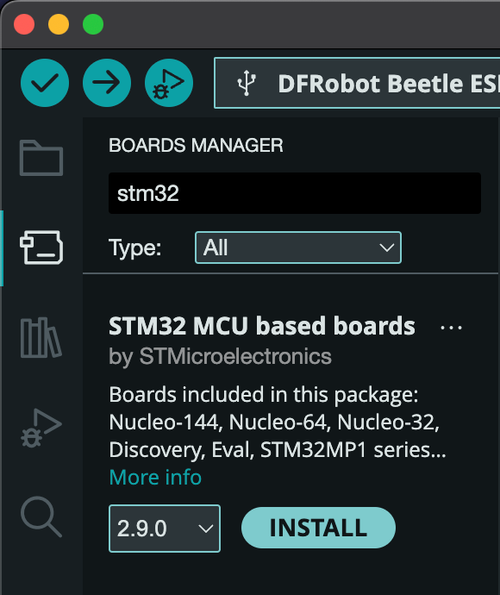
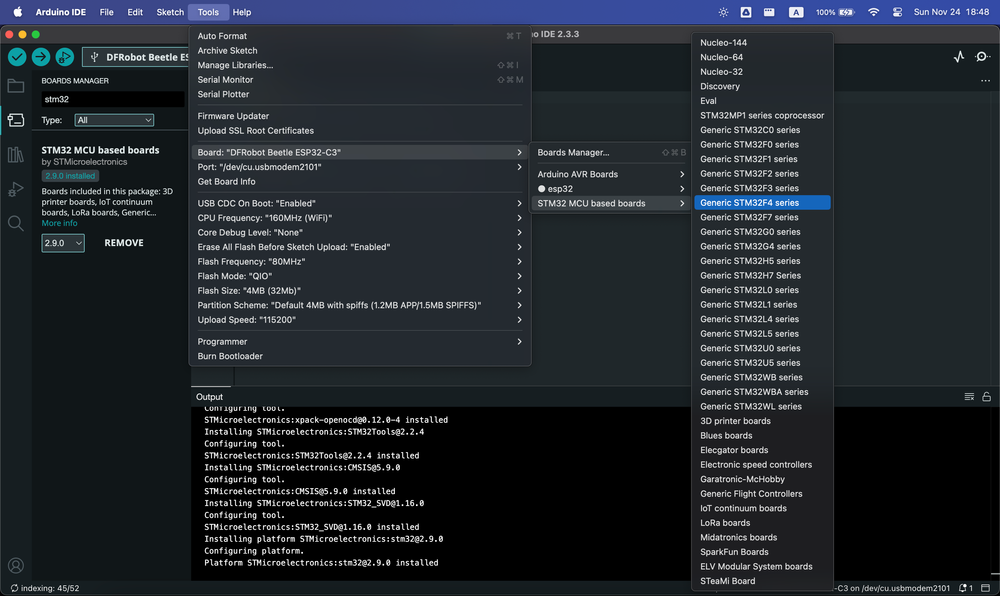
Navigate to Tools > Board > Board Manager
In the search bar, type
STM32.Look for STM32 by STMicroelectronics in the search results.
Click on the Install button to download and install the STM32 Arduino Core package.
Select the STM32 Board #
Once the STM32 board package is installed, the next step is to select your specific STM32 board in the Arduino IDE.
Connect your STM32 Board to computer using USB cable.
Go to Tools > Board > STM32 Boards
Choose the specific
STM32board you are using, such as:
- Generic STM32F1 Series
- STM32F103C8 (Blue Pill)
- Black Pill F411CE
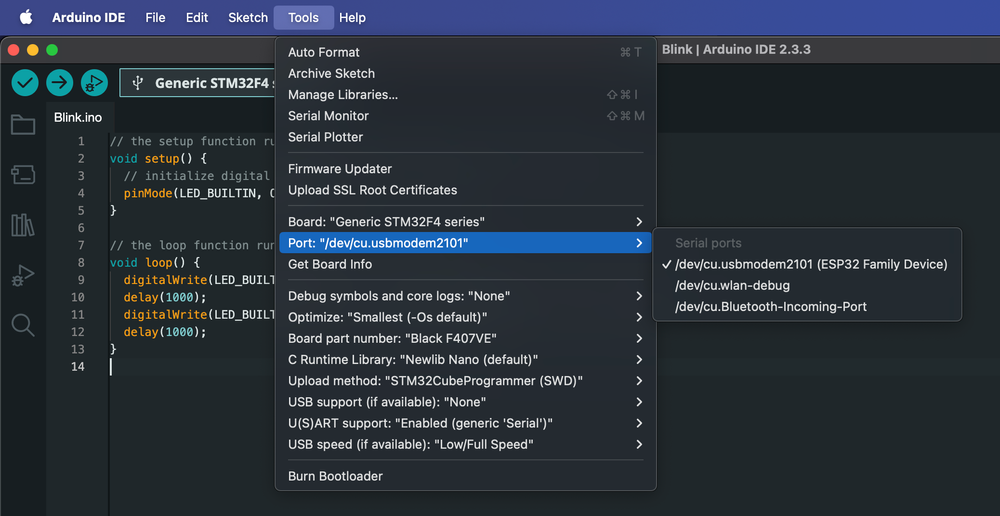
- Select Port - After selecting your STM32 board, the next crucial step is to select the correct communication port.
Program STM32 with Arduino IDE #
Now that your STM32 board is set up in the Arduino IDE, it’s time to upload your first program. As a starting point, you can use the classic Blink LED example to verify that everything is working correctly. This program toggles an LED on and off at regular intervals, allowing you to test the connection and functionality of your STM32 board.
Fill in this code in the Arduino IDE text editor:
// the setup function runs once when you press reset or power the board
void setup() {
  // initialize digital pin LED_BUILTIN as an output.
  pinMode(LED_BUILTIN, OUTPUT);
}

// the loop function runs over and over again forever
void loop() {
  digitalWrite(LED_BUILTIN, HIGH);  // turn the LED on (HIGH is the voltage level)
  delay(1000);                      // wait for a second
  digitalWrite(LED_BUILTIN, LOW);   // turn the LED off by making the voltage LOW
  delay(1000);                      // wait for a second
}
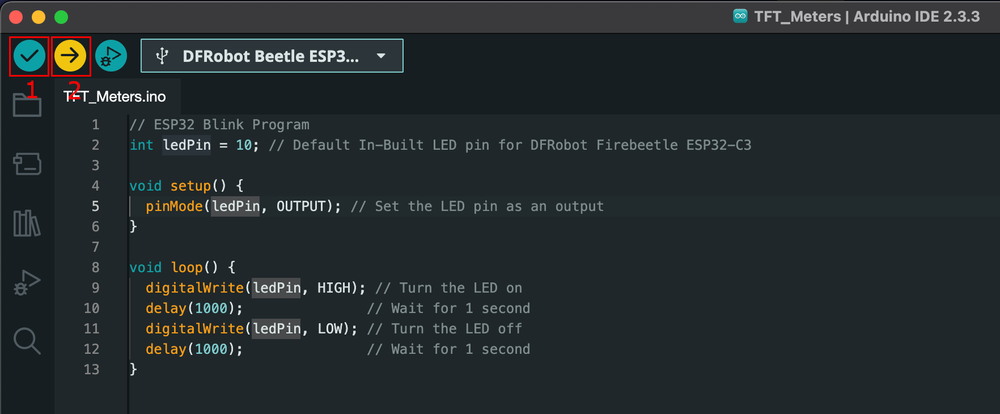
With all the setup complete, it’s time to put your STM32 board into action by compiling and uploading your first program.
- Click the Verify button (✓) located at the top-left corner of the IDE. This step compiles the code and checks for any syntax or compatibility errors. If everything is correct, you should see a message in the console like this:
Sketch uses 13244 bytes (2%) of program storage space. Maximum is 524288 bytes.
Global variables use 1216 bytes (0%) of dynamic memory, leaving 129856 bytes for local variables. Maximum is 131072 bytes.- Click the Upload button (→) next to the Verify button. This uploads the compiled code to your STM32 board. Ensure your board is connected via the correct port and powered on. The IDE will display progress messages in the console during the upload process.
Once the upload is complete, the STM32 board will automatically reset and begin executing the uploaded program.
Testing #
Once the upload process is complete, your STM32 board will automatically reset and begin executing the uploaded program. For the Blink LED program, the onboard LED (usually connected to pin PC13 on many STM32 boards like the Blue Pill) should start blinking.
A blinking LED might seem simple, but it’s a significant step in embedded programming. It confirms that your setup is working, from the Arduino IDE to the STM32 hardware. With this success, you can now explore more advanced projects using the STM32’s powerful features.
Conclusion #
Programming STM32 microcontrollers using the Arduino IDE offers a perfect balance of power and simplicity.From setting up the STM32 board in the Arduino IDE to uploading and observing your first program.
By leveraging the Arduino ecosystem, you can bypass the steep learning curve associated with traditional STM32 development environments and focus on building your projects quickly and effectively.

