ESP32 BME680 Environmental Sensor
The BME680 is a versatile environmental sensor capable of measuring air quality (VOCs), temperature, humidity, and pressure. It supports I2C and SPI interfaces and is ideal for indoor monitoring, IoT devices, and smart homes.
🔗 Quick Links
🛒 BME680 Price
ℹ️ About BME680 Environmental Sensor
The BME680, developed by Bosch Sensortec, is an advanced environmental sensor capable of measuring gas (VOCs & air quality), temperature, pressure, and humidity. Its compact design and low power consumption make it ideal for smart homes, HVAC systems, and wearable devices.
⚡ Key Features #
- 4-in-1 Sensing – Measures air quality (VOCs), temperature, humidity, and pressure.
- Air Quality Monitoring – Integrated gas sensor detects volatile organic compounds (VOCs).
- Low Power Consumption – Suitable for battery-powered applications.
- I²C & SPI Communication – Seamless integration with ESP32, Arduino, and microcontrollers.
With its multi-function sensing capabilities, the BME680 is a top choice for indoor air quality monitoring and environmental control applications. 🚀
⚙️ BME680 Sensor Technical Specifications
Below you can see the BME680 Environmental Sensor Technical Specifications. The sensor is compatible with the ESP32, operating within a voltage range suitable for microcontrollers. For precise details about its features, specifications, and usage, refer to the sensor’s datasheet.
- Type: environment
- Protocol: I2C/SPI
- Interface: I2C/SPI
- Measurement Capabilities: Gas, Temperature, Pressure, Humidity
- Operating Voltage: 1.71V to 3.6V
- Gas Sensor: Volatile Organic Compounds (VOCs)
- Pressure Range: 300 hPa to 1100 hPa
- Temperature Range: -40°C to +85°C
- Humidity Range: 0% to 100% RH
- Power Consumption: 2.1 µA in sleep mode
- Communication Speed: 10 kHz to 3.4 MHz (I2C), 10 kHz to 10 MHz (SPI)
- Package Dimensions: 3.0 mm × 3.0 mm × 0.93 mm
🔌 BME680 Sensor Pinout
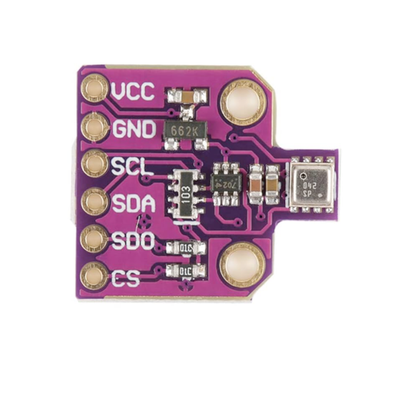
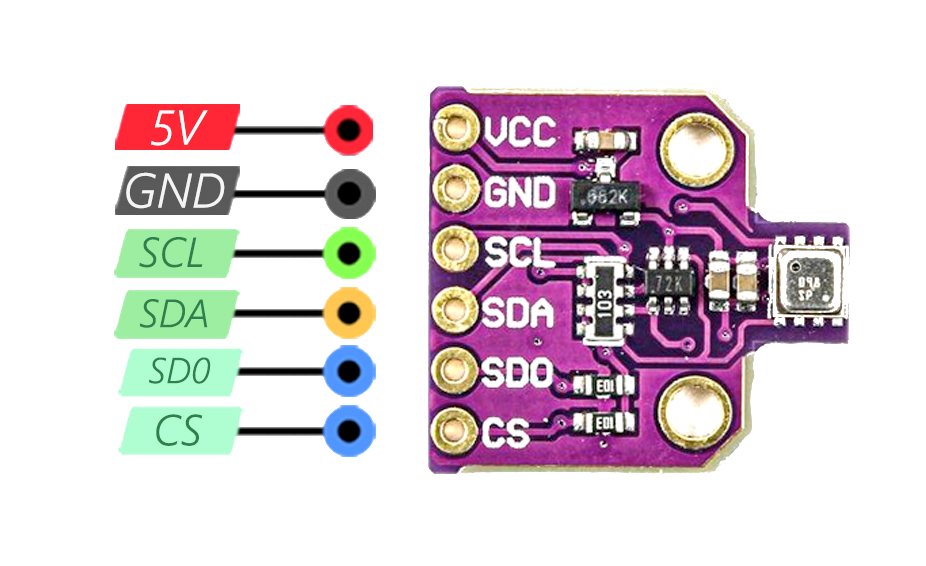
Below you can see the pinout for the BME680 Environmental Sensor. The VCC pin is used to supply power to the sensor, and it typically requires 3.3V or 5V (refer to the datasheet for specific voltage requirements). The GND pin is the ground connection and must be connected to the ground of your ESP32!
The BME680 module features the following pins: VIN: Supplies power to the module, typically 3.3V or 5V. GND: Ground pin for the module. SDA: Serial Data pin for I2C communication. Connect to the microcontroller's SDA pin. SCL: Serial Clock pin for I2C communication. Connect to the microcontroller's SCL pin. CS: Chip Select pin for SPI communication. If unused, tie to VCC. SDO: Optional output for I2C/SPI communication, configurable for address selection or SPI operation.
🧵 BME680 Wiring with ESP32
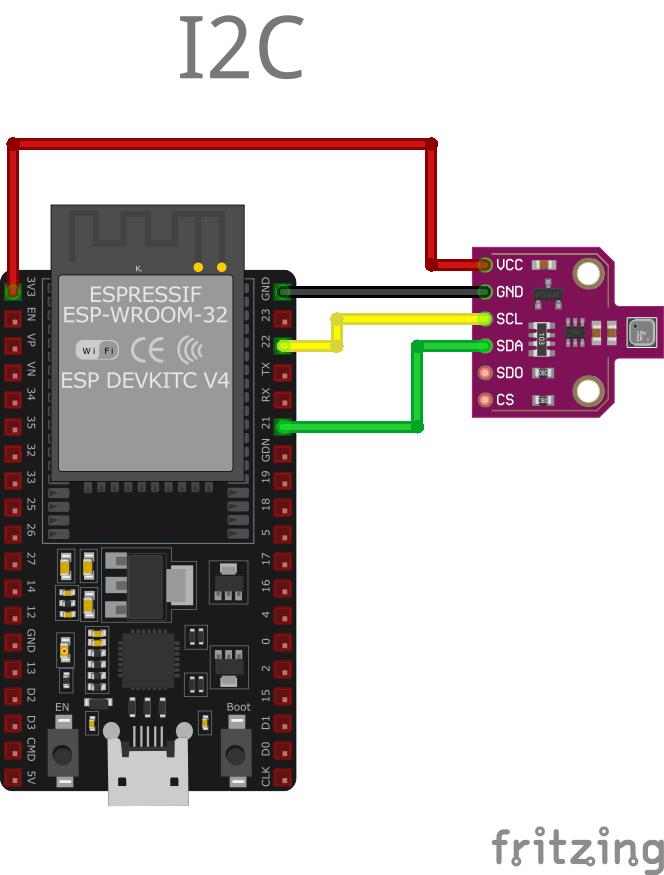
Below you can see the wiring for the BME680 Environmental Sensor with the ESP32. Connect the VCC pin of the sensor to the 3.3V pin on the ESP32 or external power supply for power and the GND pin of the sensor to the GND pin of the ESP32. Depending on the communication protocol of the sensor (e.g., I2C, SPI, UART, or analog), connect the appropriate data and clock or signal pins to compatible GPIO pins on the ESP32, as shown below in the wiring diagram.
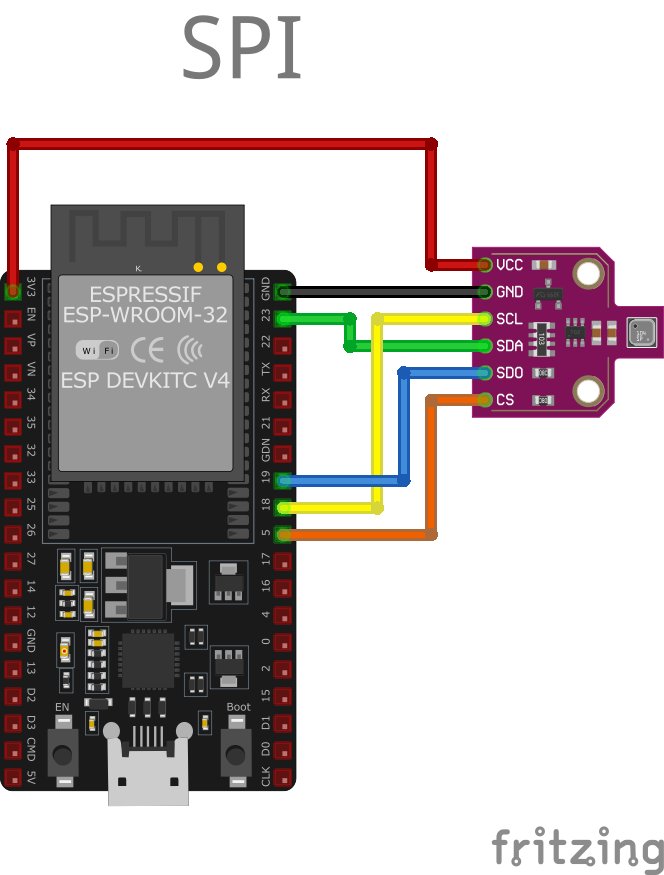
Below you can see BME680 wiring with ESP32 in SPI mode
To wire the BME680 module with an ESP32 (I2C mode): VIN: Connect to 3.3V pin on ESP32. GND: Connect to GND pin on ESP32. SDA: Connect to GPIO21 (default SDA). SCL: Connect to GPIO22 (default SCL). For SPI mode, additional connections are required for CS and SDO pins.
🛠️ BME680 Environmental Sensor Troubleshooting
This guide outlines a systematic approach to troubleshoot and resolve common problems with the . Start by confirming that the hardware connections are correct, as wiring mistakes are the most frequent cause of issues. If you are sure the connections are correct, follow the below steps to debug common issues.
❌ Sensor Not Detected on I2C Bus
Issue: The BME680 sensor is not recognized on the I2C bus, resulting in errors such as: Could not find a valid BME680 sensor, check wiring!.
Possible causes include incorrect wiring, improper power supply, or incorrect I2C address configuration.
Solution: Verify that the sensor's SDA and SCL lines are correctly connected to the corresponding pins on the microcontroller. Ensure that the sensor is supplied with the appropriate voltage (3.3V or 5V, depending on the sensor's specifications). Use an I2C scanner to detect the sensor's address; if the sensor is not found, check for loose connections or potential damage to the sensor. Additionally, confirm that the correct I2C address is specified in your code, as some BME680 modules may use different default addresses.
🔄 Intermittent Reading Errors Over I2C
Issue: The BME680 sensor intermittently fails to provide readings over the I2C interface, leading to runtime errors such as: RuntimeError: Failed to find BME680! Chip ID 0x0.
Possible causes include unstable electrical connections, insufficient power supply, or interference on the I2C bus.
Solution: Inspect all electrical connections for stability and ensure that solder joints are secure. Verify that the power supply meets the sensor's requirements and is free from significant noise or fluctuations. Consider adding pull-up resistors to the SDA and SCL lines if they are not already present, as these are essential for proper I2C communication. Additionally, ensure that the I2C bus is not overloaded with too many devices, which can cause communication issues.
💻 Compilation Errors with BME680 Library
Issue: When compiling code that interfaces with the BME680 sensor, errors such as: invalid conversion from 'int' to 'SPIClass*' occur.
Possible causes include outdated or incompatible library versions, or incorrect library usage in the code.
Solution: Ensure that the latest version of the BME680 library is installed and compatible with your development environment. Review the library's documentation to confirm proper usage and initialization in your code. If the issue persists, consider seeking assistance from the library's support resources or community forums.
🔥 Incorrect Temperature Readings Due to Self-Heating
Issue: The BME680 sensor reports temperature readings higher than the actual ambient temperature, potentially due to self-heating effects from nearby components.
Possible causes include the sensor being placed too close to heat-generating components, such as microcontrollers or voltage regulators.
Solution: Position the sensor away from components that emit heat to prevent thermal interference. Implement proper ventilation around the sensor to allow accurate ambient temperature measurements. If necessary, use physical barriers or enclosures to shield the sensor from external heat sources.
💻 Code Examples
Below you can find code examples of BME680 Environmental Sensor with ESP32 in several frameworks:
If you encounter issues while using the BME680 Environmental Sensor, check the Common Issues Troubleshooting Guide.

ESP32 BME680 Arduino IDE Code Example
Fill in your main Arduino IDE sketch file with the following code to use the BME680 Environmental Sensor:
#include <Wire.h>
#include <Adafruit_Sensor.h>
#include <Adafruit_BME680.h>

Adafruit_BME680 bme;

void setup() {
  Serial.begin(115200);
  if (!bme.begin(0x76)) {
    Serial.println("Could not find a valid BME680 sensor, check wiring!");
    while (1);
  }
  bme.setTemperatureOversampling(BME680_OS_8X);
  bme.setHumidityOversampling(BME680_OS_2X);
  bme.setPressureOversampling(BME680_OS_4X);
  bme.setGasHeater(320, 150); // 320*C for 150 ms
}

void loop() {
  if (!bme.performReading()) {
    Serial.println("Failed to perform reading :(");
    return;
  }
  Serial.print("Temperature = "); Serial.print(bme.temperature); Serial.println(" *C");
  Serial.print("Pressure = "); Serial.print(bme.pressure / 100.0); Serial.println(" hPa");
  Serial.print("Humidity = "); Serial.print(bme.humidity); Serial.println(" %");
  Serial.print("Gas = "); Serial.print(bme.gas_resistance / 1000.0); Serial.println(" KOhms");
  delay(2000);
}
This Arduino code initializes the BME680 sensor and configures it for temperature, humidity, pressure, and gas readings. Oversampling settings are used to improve data accuracy. The loop() function reads sensor data every two seconds and outputs the values to the Serial Monitor. The setGasHeater function configures the gas sensor for VOC detection.
Connect your ESP32 to your computer via a USB cable, Ensure the correct Board and Port are selected under Tools, Click the "Upload" button in the Arduino IDE to compile and upload the code to your ESP32.
ESP32 BME680 ESP-IDF Code ExampleExample in Espressif IoT Framework (ESP-IDF)
If you're using ESP-IDF to work with the BME680 Environmental Sensor, here's how you can set it up and read data from the sensor. Fill in this code in the main ESP-IDF file:
#include "bme680.h"
#include "esp_log.h"

#define I2C_MASTER_SCL_IO 22
#define I2C_MASTER_SDA_IO 21
#define I2C_MASTER_FREQ_HZ 100000
#define BME680_ADDR 0x76

static const char *TAG = "BME680";

void app_main() {
    ESP_LOGI(TAG, "Initializing BME680...");

    bme680_dev dev;
    bme680_init(&dev, I2C_MASTER_SCL_IO, I2C_MASTER_SDA_IO, I2C_MASTER_FREQ_HZ, BME680_ADDR);

    while (1) {
        bme680_data data;
        bme680_read(&dev, &data);
        ESP_LOGI(TAG, "Temperature: %.2f°C", data.temperature);
        ESP_LOGI(TAG, "Pressure: %.2f hPa", data.pressure);
        ESP_LOGI(TAG, "Humidity: %.2f%%", data.humidity);
        ESP_LOGI(TAG, "Gas Resistance: %.2f KOhms", data.gas_resistance);
        vTaskDelay(2000 / portTICK_PERIOD_MS);
    }
}
This ESP-IDF code configures the ESP32 to interface with the BME680 sensor over I2C. The bme680_init function initializes the sensor. In the app_main() loop, the sensor's environmental data (temperature, pressure, humidity, and gas resistance) is read and logged to the console every two seconds.
Update the I2C pins (I2C_MASTER_SDA_IO and I2C_MASTER_SCL_IO) to match your ESP32 hardware setup, Use idf.py build to compile the project, Use idf.py flash to upload the code to your ESP32.

ESP32 BME680 ESPHome Code Example
Fill in this configuration in your ESPHome YAML configuration file (example.yml) to integrate the BME680 Environmental Sensor
sensor:
  - platform: bme680
    temperature:
      name: "BME680 Temperature"
    pressure:
      name: "BME680 Pressure"
    humidity:
      name: "BME680 Humidity"
    gas_resistance:
      name: "BME680 Gas Resistance"
    address: 0x76
This ESPHome configuration integrates the BME680 sensor. It creates sensor entities for temperature, pressure, humidity, and gas resistance, which are monitored via the I2C address 0x76. The setup is ideal for home automation and IoT systems.
Upload this code to your ESP32 using the ESPHome dashboard or the esphome run command.

ESP32 BME680 PlatformIO Code Example
For PlatformIO, make sure to configure the platformio.ini file with the appropriate environment and libraries, and then proceed with the code.
Configure platformio.ini
First, your platformio.ini should look like below. You might need to include some libraries as shown. Make sure to change the board to your ESP32:
[env:esp32dev]
platform = espressif32
board = esp32dev
framework = arduino
lib_deps =
    adafruit/Adafruit BME680 Library
    wire
monitor_speed = 115200
ESP32 BME680 PlatformIO Example Code
Write this code in your PlatformIO project under the src/main.cpp file to use the BME680 Environmental Sensor:
#include <Wire.h>
#include "Adafruit_BME680.h"

Adafruit_BME680 bme;

void setup() {
  Serial.begin(115200);
  if (!bme.begin()) {
    Serial.println("Could not find a valid BME680 sensor, check wiring!");
    while (1);
  }
  bme.setTemperatureOversampling(BME680_OS_8X);
  bme.setHumidityOversampling(BME680_OS_2X);
  bme.setPressureOversampling(BME680_OS_4X);
  bme.setGasHeater(320, 150);
}

void loop() {
  if (bme.performReading()) {
    Serial.printf("Temp: %.2f*C, Pressure: %.2fhPa, Humidity: %.2f%%, Gas: %.2f KOhms\n",
                  bme.temperature, bme.pressure / 100.0, bme.humidity, bme.gas_resistance / 1000.0);
  }
  delay(2000);
}
This PlatformIO code integrates the Adafruit BME680 library for reading environmental data from the sensor. Temperature, humidity, pressure, and gas readings are fetched and printed to the Serial Monitor every two seconds.
Upload the code to your ESP32 using the PlatformIO "Upload" button in your IDE or the pio run --target upload command.
ESP32 BME680 MicroPython Code Example
Fill in this script in your MicroPython main.py file (main.py) to integrate the BME680 Environmental Sensor with your ESP32.
from machine import I2C, Pin
from bme680 import BME680_I2C

# Initialize I2C
i2c = I2C(0, scl=Pin(22), sda=Pin(21))

# Initialize BME680
bme = BME680_I2C(i2c=i2c)

while True:
    print(f"Temperature: {bme.temperature:.2f} °C")
    print(f"Pressure: {bme.pressure:.2f} hPa")
    print(f"Humidity: {bme.humidity:.2f} %")
    print(f"Gas: {bme.gas:.2f} KOhms")
    sleep(2)
This MicroPython code initializes the BME680 sensor using I2C. The sensor reads temperature, pressure, humidity, and gas values, which are printed to the console every two seconds.
Upload this code to your ESP32 using a MicroPython-compatible IDE, such as Thonny, uPyCraft, or tools like ampy.
Conclusion
We went through technical specifications of BME680 Environmental Sensor, its pinout, connection with ESP32 and BME680 Environmental Sensor code examples with Arduino IDE, ESP-IDF, ESPHome and PlatformIO.

