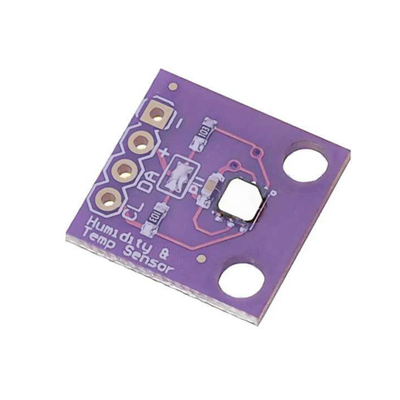
ESP32 HDC1080 / GY-213V-HDC1080 Temperature and Humidity Sensor
The HDC1080 sensor is a digital humidity and temperature sensor that provides accurate and reliable measurements. Its low power consumption and factory calibration make it ideal for applications such as HVAC systems, weather stations, and consumer electronics.
Jump to Code Examples
Quick Links
HDC1080 / GY-213V-HDC1080 Price
About HDC1080 / GY-213V-HDC1080 Temperature and Humidity Sensor
The HDC1080, developed by Texas Instruments, is a digital humidity sensor with an integrated temperature sensor that provides excellent measurement accuracy at very low power. It operates over a wide supply range and is a low-cost, low-power alternative to competitive solutions in a wide range of common applications. The humidity and temperature sensors are factory calibrated.HDC1080 / GY-213V-HDC1080 Sensor Technical Specifications
Below you can see the HDC1080 / GY-213V-HDC1080 Temperature and Humidity Sensor Technical Specifications. The sensor is compatible with the ESP32, operating within a voltage range suitable for microcontrollers. For precise details about its features, specifications, and usage, refer to the sensor’s datasheet.
- Protocol: I2C
- Operating Voltage: 2.7V to 5.5V
- Temperature Range: -40°C to 125°C
- Humidity Range: 0% to 100% RH
- Temperature Accuracy: ±0.2°C
- Humidity Accuracy: ±2% RH
- Interface: I2C
- Dimensions: 3mm x 3mm x 0.9mm
HDC1080 / GY-213V-HDC1080 Sensor Pinout
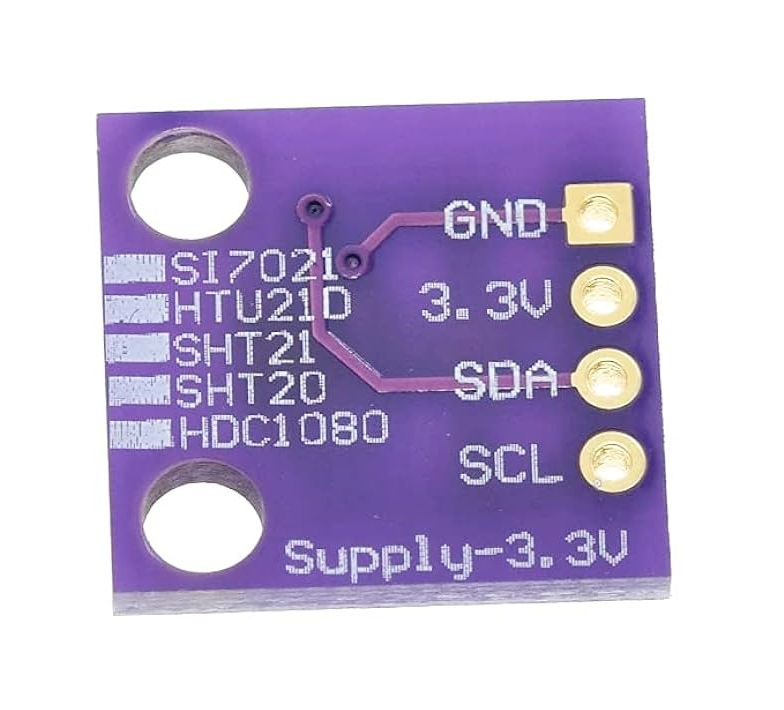
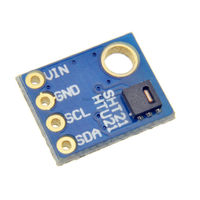
Below you can see the pinout for the HDC1080 / GY-213V-HDC1080 Temperature and Humidity Sensor. The VCC pin is used to supply power to the sensor, and it typically requires 3.3V or 5V (refer to the datasheet for specific voltage requirements). The GND pin is the ground connection and must be connected to the ground of your ESP32!
The HDC1080 pinout is as follows:
- Pin 1 (GND): Ground.
- Pin 2 (VDD): Power supply voltage (2.7V to 5.5V).
- Pin 3 (SDA): Serial Data Line for I2C communication.
- Pin 4 (SCL): Serial Clock Line for I2C communication.
HDC1080 / GY-213V-HDC1080 Wiring with ESP32
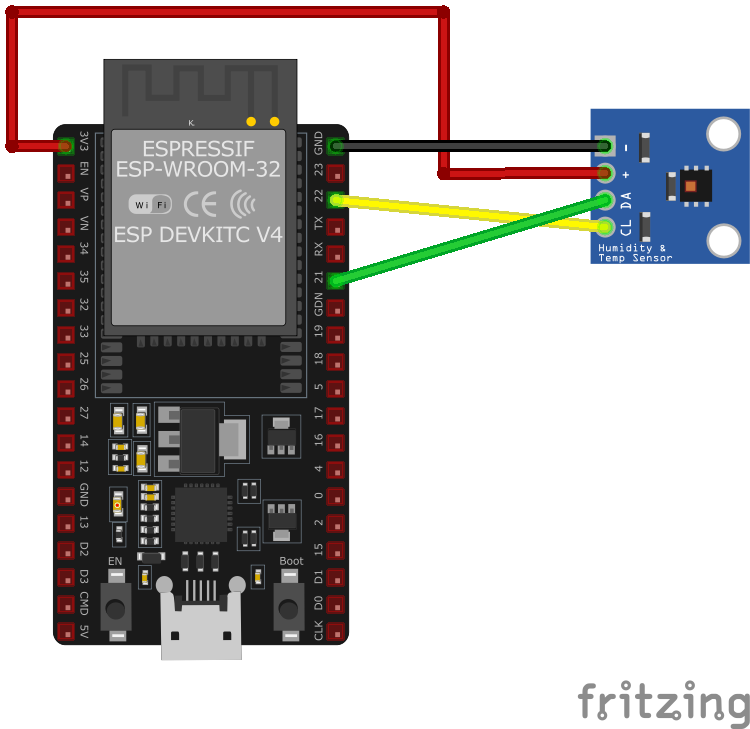
Below you can see the wiring for the HDC1080 / GY-213V-HDC1080 Temperature and Humidity Sensor with the ESP32. Connect the VCC pin of the sensor to the 3.3V pin on the ESP32 or external power supply for power and the GND pin of the sensor to the GND pin of the ESP32. Depending on the communication protocol of the sensor (e.g., I2C, SPI, UART, or analog), connect the appropriate data and clock or signal pins to compatible GPIO pins on the ESP32, as shown below in the wiring diagram.
- Connect VDD to the 3.3V pin on the ESP32.
- Connect GND to the ground (GND) of the ESP32.
- Connect SDA to the ESP32's GPIO21 (default I2C data pin).
- Connect SCL to the ESP32's GPIO22 (default I2C clock pin).
- Place pull-up resistors (10kΩ) between SDA and VDD, and SCL and VDD, to ensure reliable communication.
Code Examples
Below you can find code examples of HDC1080 / GY-213V-HDC1080 Temperature and Humidity Sensor with ESP32 in several frameworks:
If you encounter issues while using the HDC1080 / GY-213V-HDC1080 Temperature and Humidity Sensor, check the Common Issues Troubleshooting Guide.

ESP32 HDC1080 / GY-213V-HDC1080 Arduino IDE Code Example
Fill in your main Arduino IDE sketch file with the following code to use the HDC1080 / GY-213V-HDC1080 Temperature and Humidity Sensor:
#include <Wire.h>
#include "ClosedCube_HDC1080.h"

ClosedCube_HDC1080 hdc1080;

void setup() {
  Wire.begin();
  Serial.begin(9600);
  hdc1080.begin(0x40);
}

void loop() {
  float temperature = hdc1080.readTemperature();
  float humidity = hdc1080.readHumidity();
  Serial.print("Temperature: ");
  Serial.print(temperature, 2);
  Serial.println(" °C");
  Serial.print("Humidity: ");
  Serial.print(humidity, 2);
  Serial.println(" %");
  delay(2000);
}
This Arduino sketch demonstrates how to interface with the HDC1080 sensor using the ClosedCube_HDC1080 library. It initializes the sensor and reads temperature and humidity data every 2 seconds, printing the results to the Serial Monitor. Ensure that the ClosedCube_HDC1080 library is installed in your Arduino IDE.
Connect your ESP32 to your computer via a USB cable, Ensure the correct Board and Port are selected under Tools, Click the "Upload" button in the Arduino IDE to compile and upload the code to your ESP32.

ESP32 HDC1080 / GY-213V-HDC1080 ESP-IDF Code ExampleExample in Espressif IoT Framework (ESP-IDF)
If you're using ESP-IDF to work with the HDC1080 / GY-213V-HDC1080 Temperature and Humidity Sensor, here's how you can set it up and read data from the sensor. Fill in this code in the main ESP-IDF file:
#include <stdio.h>
#include "freertos/FreeRTOS.h"
#include "freertos/task.h"
#include "driver/i2c.h"

#define I2C_MASTER_SCL_IO    22    /*!< GPIO number used for I2C master clock */
#define I2C_MASTER_SDA_IO    21    /*!< GPIO number used for I2C master data */
#define I2C_MASTER_NUM       I2C_NUM_0 /*!< I2C master I2C port number */
#define I2C_MASTER_FREQ_HZ   100000     /*!< I2C master clock frequency */
#define HDC1080_SENSOR_ADDR  0x40       /*!< HDC1080 I2C address */

static esp_err_t i2c_master_init(void) {
    i2c_config_t conf = {
        .mode = I2C_MODE_MASTER,
        .sda_io_num = I2C_MASTER_SDA_IO,
        .scl_io_num = I2C_MASTER_SCL_IO,
        .sda_pullup_en = GPIO_PULLUP_ENABLE,
        .scl_pullup_en = GPIO_PULLUP_ENABLE,
        .master.clk_speed = I2C_MASTER_FREQ_HZ,
    };
    esp_err_t err = i2c_param_config(I2C_MASTER_NUM, &conf);
    if (err != ESP_OK) {
        return err;
    }
    return i2c_driver_install(I2C_MASTER_NUM, conf.mode, 0, 0, 0);
}

void read_hdc1080_sensor() {
    uint8_t data[4];

    // Send command to measure temperature and humidity
    uint8_t cmd = 0x00; // Temperature measurement command
    i2c_master_write_to_device(I2C_MASTER_NUM, HDC1080_SENSOR_ADDR, &cmd, 1, pdMS_TO_TICKS(1000));
    vTaskDelay(pdMS_TO_TICKS(15)); // Delay for measurement to complete

    // Read 4 bytes of data: temperature (2 bytes) + humidity (2 bytes)
    i2c_master_read_from_device(I2C_MASTER_NUM, HDC1080_SENSOR_ADDR, data, 4, pdMS_TO_TICKS(1000));

    // Convert temperature and humidity values
    uint16_t raw_temp = (data[0] << 8) | data[1];
    uint16_t raw_humidity = (data[2] << 8) | data[3];

    float temperature = (raw_temp / 65536.0) * 165.0 - 40.0;
    float humidity = (raw_humidity / 65536.0) * 100.0;

    printf("Temperature: %.2f °C, Humidity: %.2f %%\n", temperature, humidity);
}

void app_main() {
    ESP_ERROR_CHECK(i2c_master_init());

    while (1) {
        read_hdc1080_sensor();
        vTaskDelay(pdMS_TO_TICKS(2000));
    }
}
This ESP-IDF code demonstrates how to interface with the HDC1080 sensor using the I2C protocol. It initializes the I2C master, sends a command to the sensor to measure temperature and humidity, reads the raw data, converts it to human-readable values, and prints the results to the console every 2 seconds.
Update the I2C pins (I2C_MASTER_SDA_IO and I2C_MASTER_SCL_IO) to match your ESP32 hardware setup, Use idf.py build to compile the project, Use idf.py flash to upload the code to your ESP32.

ESP32 HDC1080 / GY-213V-HDC1080 ESPHome Code Example
Fill in this configuration in your ESPHome YAML configuration file (example.yml) to integrate the HDC1080 / GY-213V-HDC1080 Temperature and Humidity Sensor
sensor:
  - platform: hdc1080
    temperature:
      name: "Living Room Temperature"
    humidity:
      name: "Living Room Humidity"
    update_interval: 60s
This ESPHome configuration defines the HDC1080 sensor. Two sensor entities are created: one for temperature and one for humidity, with user-friendly names such as 'Living Room Temperature' and 'Living Room Humidity.' The `update_interval` is set to 60 seconds, ensuring that the sensor data is updated once per minute.
Upload this code to your ESP32 using the ESPHome dashboard or the esphome run command.

ESP32 HDC1080 / GY-213V-HDC1080 PlatformIO Code Example
For PlatformIO, make sure to configure the platformio.ini file with the appropriate environment and libraries, and then proceed with the code.
Configure platformio.ini
First, your platformio.ini should look like below. You might need to include some libraries as shown. Make sure to change the board to your ESP32:
[env:esp32dev]
platform = espressif32
board = esp32dev
framework = arduino
lib_deps =
    closedcube/ClosedCube HDC1080 @ ^1.1.0
monitor_speed = 115200
ESP32 HDC1080 / GY-213V-HDC1080 PlatformIO Example Code
Write this code in your PlatformIO project under the src/main.cpp file to use the HDC1080 / GY-213V-HDC1080 Temperature and Humidity Sensor:
#include <Wire.h>
#include "ClosedCube_HDC1080.h"

ClosedCube_HDC1080 hdc1080;

void setup() {
    Wire.begin();
    Serial.begin(115200);
    hdc1080.begin(0x40);
    Serial.println("HDC1080 initialized.");
}

void loop() {
    float temperature = hdc1080.readTemperature();
    float humidity = hdc1080.readHumidity();

    Serial.print("Temperature: ");
    Serial.print(temperature, 2);
    Serial.println(" °C");
    Serial.print("Humidity: ");
    Serial.print(humidity, 2);
    Serial.println(" %");

    delay(2000);
}
This PlatformIO code demonstrates how to use the `ClosedCube_HDC1080` library to interface with the HDC1080 sensor. It initializes the sensor and reads temperature and humidity data every 2 seconds, printing the results to the Serial Monitor.
Upload the code to your ESP32 using the PlatformIO "Upload" button in your IDE or the pio run --target upload command.
ESP32 HDC1080 / GY-213V-HDC1080 MicroPython Code Example
Fill in this script in your MicroPython main.py file (main.py) to integrate the HDC1080 / GY-213V-HDC1080 Temperature and Humidity Sensor with your ESP32.
from machine import I2C, Pin
from time import sleep

# Initialize I2C
i2c = I2C(0, scl=Pin(22), sda=Pin(21))

# HDC1080 I2C address
HDC1080_ADDR = 0x40

# Function to read temperature and humidity
def read_hdc1080():
    i2c.writeto(HDC1080_ADDR, b'\x00')  # Command to start measurement
    sleep(0.015)  # Wait for measurement to complete
    data = i2c.readfrom(HDC1080_ADDR, 4)  # Read 4 bytes of data

    # Convert temperature and humidity data
    raw_temp = (data[0] << 8) | data[1]
    raw_humidity = (data[2] << 8) | data[3]

    temperature = (raw_temp / 65536.0) * 165.0 - 40.0
    humidity = (raw_humidity / 65536.0) * 100.0

    return temperature, humidity

while True:
    temp, hum = read_hdc1080()
    print("Temperature: {:.2f} °C".format(temp))
    print("Humidity: {:.2f} %".format(hum))
    sleep(2)
This MicroPython script interfaces with the HDC1080 sensor using the I2C protocol. It sends a command to the sensor to trigger temperature and humidity measurements, reads the raw data, converts it into human-readable values, and prints the results to the console every 2 seconds.
Upload this code to your ESP32 using a MicroPython-compatible IDE, such as Thonny, uPyCraft, or tools like ampy.
HDC1080 / GY-213V-HDC1080 Temperature and Humidity Sensor Troubleshooting
This guide outlines a systematic approach to troubleshoot and resolve common problems with the . Start by confirming that the hardware connections are correct, as wiring mistakes are the most frequent cause of issues. If you are sure the connections are correct, follow the below steps to debug common issues.
Humidity Readings Stuck at 100%
Issue: The HDC1080 sensor reports a constant humidity value of 100%, regardless of the actual environmental conditions.
Possible causes include sensor saturation due to prolonged exposure to high humidity environments or contamination on the sensor's surface.
Solution: Allow the sensor to operate in a controlled, lower humidity environment to facilitate recovery. If the issue persists, consider activating the sensor's internal heater to help eliminate moisture or contaminants. Ensure that the sensor is not exposed to condensing environments, and verify that no physical obstructions or residues are present on the sensor's surface. (e2e.ti.com)
Temperature and Humidity Readings Return 0xFFFF
Issue: Attempts to read temperature and humidity values from the HDC1080 sensor consistently return 0xFFFF, indicating a communication error.
Possible causes include incorrect I2C communication sequences, improper sensor initialization, or issues with the microcontroller's I2C implementation.
Solution: Review the I2C communication sequence to ensure it aligns with the HDC1080 datasheet specifications. Confirm that the sensor's configuration register is correctly set before initiating measurements. Additionally, verify the integrity of the I2C connections and consider testing with a different microcontroller or I2C library to rule out implementation-specific issues. (e2e.ti.com)
Humidity Measurement Errors Up to +6%
Issue: The HDC1080 sensor exhibits humidity measurement errors, with readings deviating by up to +6% from the actual humidity levels.
Possible causes include sensor drift over time, exposure to contaminants, or calibration issues.
Solution: Implement a regular calibration schedule to maintain measurement accuracy. Ensure that the sensor is protected from environmental contaminants and consider using conformal coatings if appropriate. If the sensor has been exposed to harsh conditions, utilize the internal heater to attempt recovery. For critical applications, consider cross-referencing readings with a calibrated reference device. (e2e.ti.com)
Inconsistent Humidity Readings Across Multiple Sensors
Issue: Multiple HDC1080 sensors in identical conditions report significantly different humidity values, indicating inconsistency among sensors.
Possible causes include manufacturing variances, sensor contamination, or differences in sensor placement leading to micro-environmental discrepancies.
Solution: Perform a controlled comparison by placing all sensors in a stable environment and recording their outputs. Identify and replace any outliers that consistently deviate from the mean. Ensure that all sensors are handled and soldered according to the manufacturer's guidelines to prevent contamination. For applications requiring high precision, consider individual sensor calibration. (e2e.ti.com)
Conclusion
We went through technical specifications of HDC1080 / GY-213V-HDC1080 Temperature and Humidity Sensor, its pinout, connection with ESP32 and HDC1080 / GY-213V-HDC1080 Temperature and Humidity Sensor code examples with Arduino IDE, ESP-IDF, ESPHome and PlatformIO.

