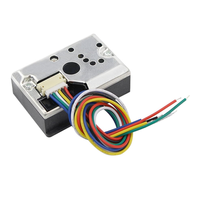
ESP32 MH-Z19 NDIR CO₂ Sensor
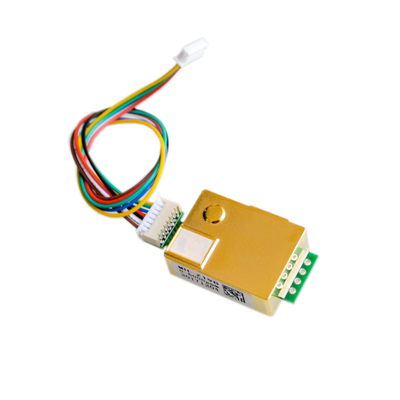
The MH-Z19 is a high-accuracy CO₂ sensor using NDIR technology, suitable for air quality monitoring. It supports UART and PWM communication, with a detection range up to 2000 ppm (optionally 5000 ppm). Its compact design and long lifespan make it ideal for HVAC and indoor air quality systems.
🔗 Quick Links
🛒 MH-Z19 Price
ℹ️ About MH-Z19 NDIR CO₂ Sensor
The MH-Z19 is a Non-Dispersive Infrared (NDIR) CO₂ sensor designed for precise carbon dioxide (CO₂) measurement. With high sensitivity, selectivity, and a long lifespan, it is ideal for HVAC systems, indoor air quality monitoring, and industrial applications.
⚡ Key Features #
- NDIR Technology – Ensures accurate CO₂ detection with minimal interference.
- Flexible Data Output – Supports both UART and PWM communication.
- Long Lifespan & High Stability – Reliable for continuous air quality monitoring.
- Ideal for Smart Air Quality Systems – Commonly used in HVAC, greenhouses, and CO₂ monitoring devices.
For VOC and multi-gas detection, consider the CCS811, which detects TVOCs and eCO₂. 🚀
⚙️ MH-Z19 Sensor Technical Specifications
Below you can see the MH-Z19 NDIR CO₂ Sensor Technical Specifications. The sensor is compatible with the ESP32, operating within a voltage range suitable for microcontrollers. For precise details about its features, specifications, and usage, refer to the sensor’s datasheet.
- Type: airQuality
- Protocol: UART, PWM
- Operating Voltage: 3.6V to 5.5V
- Current Consumption: Max 18 mA
- Detection Range: 0 to 2000 ppm (optional 5000 ppm)
- Accuracy: ±50 ppm + 5% of reading
- Response Time: <60 seconds
- Operating Temperature: 0°C to 50°C
- Communication Protocols: UART, PWM
- Dimensions: 33mm × 20mm × 9mm
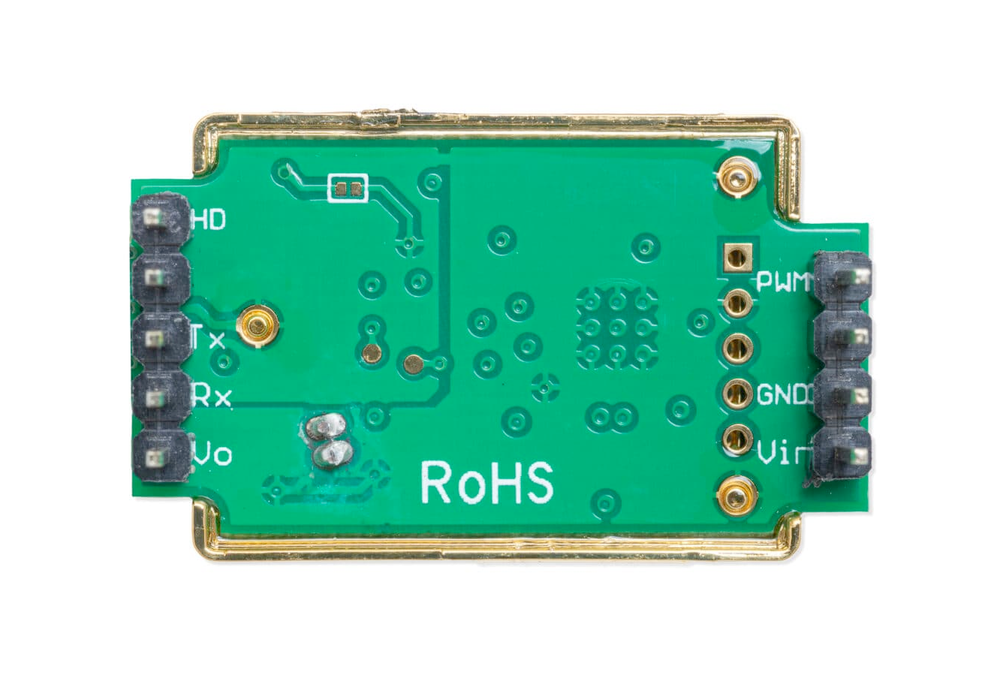
🔌 MH-Z19 Sensor Pinout
Below you can see the pinout for the MH-Z19 NDIR CO₂ Sensor. The VCC pin is used to supply power to the sensor, and it typically requires 3.3V or 5V (refer to the datasheet for specific voltage requirements). The GND pin is the ground connection and must be connected to the ground of your ESP32!
The MH-Z19 pinout is as follows:
- Pin 1 (Vout): 3.3V output (max 10mA).
- Pin 2 (RXD): UART receive input (3.3V logic).
- Pin 3 (TXD): UART transmit output (3.3V logic).
- Pin 4 (SR): Factory reserved.
- Pin 5 (HD): Zero calibration input (pull low for >7s).
- Pin 6 (Vin): Power supply input (3.6V to 5.5V).
- Pin 7 (GND): Ground.
- Pin 8 (AOT): Factory reserved.
- Pin 9 (PWM): PWM output for CO₂ concentration.
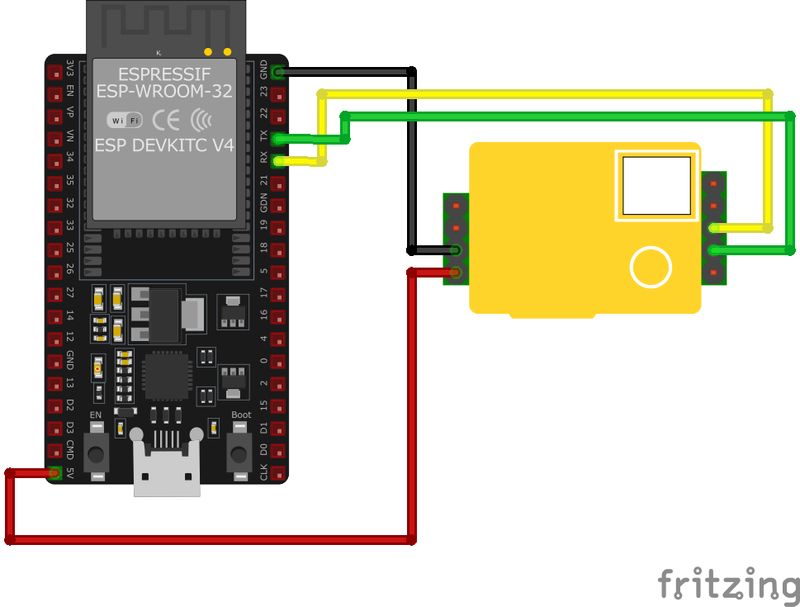
🧵 MH-Z19 Wiring with ESP32
Below you can see the wiring for the MH-Z19 NDIR CO₂ Sensor with the ESP32. Connect the VCC pin of the sensor to the 3.3V pin on the ESP32 or external power supply for power and the GND pin of the sensor to the GND pin of the ESP32. Depending on the communication protocol of the sensor (e.g., I2C, SPI, UART, or analog), connect the appropriate data and clock or signal pins to compatible GPIO pins on the ESP32, as shown below in the wiring diagram.
Vin to a 5V power supply, GND to ground, TXD to the microcontroller's RX pin, and RXD to the microcontroller's TX pin. Ensure the microcontroller's logic levels are compatible with the sensor's 3.3V UART interface. Use a level shifter if necessary for voltage matching.🛠️ MH-Z19 NDIR CO₂ Sensor Troubleshooting
This guide outlines a systematic approach to troubleshoot and resolve common problems with the . Start by confirming that the hardware connections are correct, as wiring mistakes are the most frequent cause of issues. If you are sure the connections are correct, follow the below steps to debug common issues.
❌ Sensor Initialization Failure
Issue: The MH-Z19 sensor fails to initialize, resulting in errors such as: MHZ19: Invalid preamble from MHZ19!.
Possible causes include incorrect wiring connections, incompatible serial communication settings, or insufficient power supply.
Solution: Verify that the sensor's TX and RX pins are correctly connected to the corresponding RX and TX pins on the microcontroller. Ensure that the serial communication parameters (baud rate, data bits, etc.) match between the sensor and the microcontroller. Provide a stable 5V power supply to the sensor, as it requires 4.5V to 5.5V for proper operation.
⚠️ Consistent High CO2 Readings
Issue: The sensor outputs a constant high CO2 concentration value, such as 5000 ppm, which is the maximum measurable value.
Possible causes include sensor calibration issues, exposure to high concentrations of CO2 during startup, or faulty sensor hardware.
Solution: Perform a zero-point calibration in a fresh air environment (approximately 400 ppm CO2) to reset the sensor's baseline. Ensure the sensor is exposed to clean air during initialization to prevent incorrect baseline calibration. If the issue persists, consider replacing the sensor, as it may be defective.
🌡️ Inaccurate CO2 Readings
Issue: The MH-Z19 sensor provides CO2 readings that are significantly higher or lower than expected.
Possible causes include incorrect calibration, interference from other gases, or environmental factors.
Solution: Check the sensor's calibration status and perform a manual calibration if necessary. Place the sensor in an environment with clean air to establish a proper baseline. Avoid placing the sensor near sources of volatile organic compounds (VOCs) or other gases that may interfere with CO2 measurements.
🔌 Serial Communication Errors
Issue: Serial communication with the MH-Z19 sensor fails, resulting in errors such as: Timeout waiting for response.
Possible causes include incorrect baud rate settings, reversed TX/RX connections, or noisy serial lines.
Solution: Confirm the baud rate used by the sensor (typically 9600 or 19200) and match it with the microcontroller's serial port settings. Double-check the TX and RX connections to ensure they are not swapped. Use short, high-quality cables to minimize noise on the serial lines.
💻 Code Examples
Below you can find code examples of MH-Z19 NDIR CO₂ Sensor with ESP32 in several frameworks:
If you encounter issues while using the MH-Z19 NDIR CO₂ Sensor, check the Common Issues Troubleshooting Guide.

ESP32 MH-Z19 Arduino IDE Code Example
Fill in your main Arduino IDE sketch file with the following code to use the MH-Z19 NDIR CO₂ Sensor:
#include <SoftwareSerial.h>

SoftwareSerial mySerial(10, 11); // RX, TX

void setup() {
    Serial.begin(9600);
    mySerial.begin(9600);
}

void loop() {
    byte cmd[9] = {0xFF, 0x01, 0x86, 0x00, 0x00, 0x00, 0x00, 0x00, 0x79};
    mySerial.write(cmd, 9);
    delay(500);
    if (mySerial.available()) {
        byte response[9];
        mySerial.readBytes(response, 9);
        if (response[0] == 0xFF && response[1] == 0x86) {
            int CO2 = (response[2] << 8) + response[3];
            Serial.print("CO2 Concentration: ");
            Serial.print(CO2);
            Serial.println(" ppm");
        }
    }
    delay(2000);
}
This Arduino sketch interfaces with the MH-Z19 sensor using software serial. It sends a command to request CO₂ concentration data and processes the response. The CO₂ concentration in ppm is displayed in the Serial Monitor every 2.5 seconds.
Connect your ESP32 to your computer via a USB cable, Ensure the correct Board and Port are selected under Tools, Click the "Upload" button in the Arduino IDE to compile and upload the code to your ESP32.
ESP32 MH-Z19 ESP-IDF Code ExampleExample in Espressif IoT Framework (ESP-IDF)
If you're using ESP-IDF to work with the MH-Z19 NDIR CO₂ Sensor, here's how you can set it up and read data from the sensor. Fill in this code in the main ESP-IDF file:
#include <stdio.h>
#include "driver/uart.h"
#include "freertos/FreeRTOS.h"
#include "freertos/task.h"

#define UART_NUM UART_NUM_1
#define TXD_PIN (GPIO_NUM_17)
#define RXD_PIN (GPIO_NUM_16)

void app_main(void) {
    const uart_config_t uart_config = {
        .baud_rate = 9600,
        .data_bits = UART_DATA_8_BITS,
        .parity = UART_PARITY_DISABLE,
        .stop_bits = UART_STOP_BITS_1,
        .flow_ctrl = UART_HW_FLOWCTRL_DISABLE
    };
    uart_param_config(UART_NUM, &uart_config);
    uart_set_pin(UART_NUM, TXD_PIN, RXD_PIN, UART_PIN_NO_CHANGE, UART_PIN_NO_CHANGE);
    uart_driver_install(UART_NUM, 256, 0, 0, NULL, 0);

    uint8_t cmd[9] = {0xFF, 0x01, 0x86, 0x00, 0x00, 0x00, 0x00, 0x00, 0x79};
    uint8_t response[9];

    while (1) {
        uart_write_bytes(UART_NUM, (const char *)cmd, 9);
        vTaskDelay(pdMS_TO_TICKS(500));

        int len = uart_read_bytes(UART_NUM, response, 9, pdMS_TO_TICKS(1000));
        if (len == 9 && response[0] == 0xFF && response[1] == 0x86) {
            int CO2 = (response[2] << 8) | response[3];
            printf("CO2 Concentration: %d ppm\n", CO2);
        }
        vTaskDelay(pdMS_TO_TICKS(2000));
    }
}
This ESP-IDF example configures UART for communication with the MH-Z19 sensor. It sends a command to request CO₂ concentration, reads the response, and calculates the CO₂ concentration in ppm. The result is printed to the console every 2.5 seconds.
Update the I2C pins (I2C_MASTER_SDA_IO and I2C_MASTER_SCL_IO) to match your ESP32 hardware setup, Use idf.py build to compile the project, Use idf.py flash to upload the code to your ESP32.
ESP32 MH-Z19 ESPHome Code Example
Fill in this configuration in your ESPHome YAML configuration file (example.yml) to integrate the MH-Z19 NDIR CO₂ Sensor
uart:
  tx_pin: GPIO17
  rx_pin: GPIO16
  baud_rate: 9600

sensor:
  - platform: mhz19
    co2:
      name: "MH-Z19 CO2"
    temperature:
      name: "MH-Z19 Temperature"
    update_interval: 60s
This ESPHome configuration interfaces with the MH-Z19 sensor over UART using GPIO17 (TX) and GPIO16 (RX). The CO₂ concentration and temperature are read every 60 seconds and displayed as named sensors. The UART baud rate is set to 9600.
Upload this code to your ESP32 using the ESPHome dashboard or the esphome run command.

ESP32 MH-Z19 PlatformIO Code Example
For PlatformIO, make sure to configure the platformio.ini file with the appropriate environment and libraries, and then proceed with the code.
Configure platformio.ini
First, your platformio.ini should look like below. You might need to include some libraries as shown. Make sure to change the board to your ESP32:
[env:esp32dev]
platform = espressif32
board = esp32dev
framework = arduino
monitor_speed = 115200
ESP32 MH-Z19 PlatformIO Example Code
Write this code in your PlatformIO project under the src/main.cpp file to use the MH-Z19 NDIR CO₂ Sensor:
#include <MHZ19.h>
#include <SoftwareSerial.h>

SoftwareSerial mySerial(16, 17); // RX, TX
MHZ19 myMHZ19;

void setup() {
    Serial.begin(115200);
    mySerial.begin(9600);
    myMHZ19.begin(mySerial);
    myMHZ19.autoCalibration();
}

void loop() {
    int co2 = myMHZ19.getCO2();
    float temp = myMHZ19.getTemperature();

    if (co2 > 0) {
        Serial.print("CO2 Concentration: ");
        Serial.print(co2);
        Serial.println(" ppm");
    } else {
        Serial.println("Error reading CO2 concentration");
    }

    Serial.print("Temperature: ");
    Serial.print(temp);
    Serial.println(" °C");

    delay(5000);
}
This PlatformIO example uses the MHZ19 library to interface with the MH-Z19 sensor over SoftwareSerial. The sensor's CO₂ concentration and temperature are printed every 5 seconds. Automatic calibration is enabled.
Upload the code to your ESP32 using the PlatformIO "Upload" button in your IDE or the pio run --target upload command.
ESP32 MH-Z19 MicroPython Code Example
Fill in this script in your MicroPython main.py file (main.py) to integrate the MH-Z19 NDIR CO₂ Sensor with your ESP32.
from machine import UART, Pin
import time

uart = UART(2, baudrate=9600, tx=Pin(17), rx=Pin(16))

cmd = bytearray([0xFF, 0x01, 0x86, 0x00, 0x00, 0x00, 0x00, 0x00, 0x79])

def read_co2():
    uart.write(cmd)
    time.sleep(0.1)
    if uart.any():
        response = uart.read(9)
        if len(response) == 9 and response[0] == 0xFF and response[1] == 0x86:
            co2 = (response[2] << 8) | response[3]
            return co2
    return None

while True:
    co2 = read_co2()
    if co2 is not None:
        print(f"CO2 Concentration: {co2} ppm")
    else:
        print("Error reading CO2 concentration")
    time.sleep(2)
This MicroPython script interfaces with the MH-Z19 sensor using UART (GPIO17 TX, GPIO16 RX). The script sends a command to request CO₂ concentration and parses the response. The CO₂ concentration in ppm is printed every 2 seconds, and errors during communication are handled gracefully.
Upload this code to your ESP32 using a MicroPython-compatible IDE, such as Thonny, uPyCraft, or tools like ampy.
Conclusion
We went through technical specifications of MH-Z19 NDIR CO₂ Sensor, its pinout, connection with ESP32 and MH-Z19 NDIR CO₂ Sensor code examples with Arduino IDE, ESP-IDF, ESPHome and PlatformIO.

