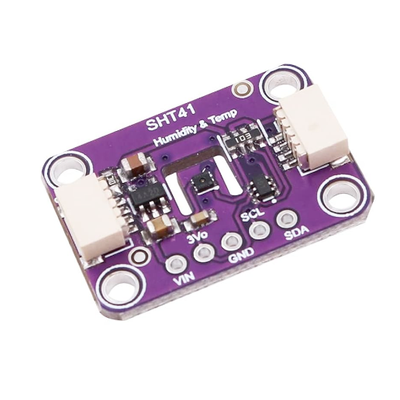
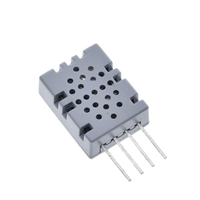
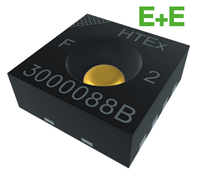
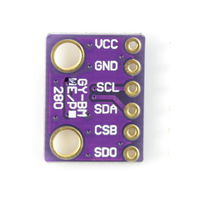
ESP32 SHT41 / SHT41-D / GY-SHT41-D Temperature and Humidity Sensor
The SHT41 sensor is part of Sensirion's SHT4x series and offers high-accuracy temperature and humidity measurements. It is factory calibrated and provides digital I2C output for easy integration. The SHT41 is a robust and reliable solution for applications requiring precise environmental monitoring.
Jump to Code Examples
Quick Links
SHT41 / SHT41-D / GY-SHT41-D Price
About SHT41 / SHT41-D / GY-SHT41-D Temperature and Humidity Sensor
The SHT41, SHT41-D, and GY-SHT41-D sensors, developed by Sensirion, are highly precise temperature and humidity sensors based on the SHT4x series. They provide fully calibrated, linearized, and temperature-compensated digital outputs. These sensors are ideal for demanding applications, including environmental monitoring, industrial processes, and IoT devices.SHT41 / SHT41-D / GY-SHT41-D Sensor Technical Specifications
Below you can see the SHT41 / SHT41-D / GY-SHT41-D Temperature and Humidity Sensor Technical Specifications. The sensor is compatible with the ESP32, operating within a voltage range suitable for microcontrollers. For precise details about its features, specifications, and usage, refer to the sensor’s datasheet.
- Protocol: I2C
- Operating Voltage: 2.4V to 5.5V
- Temperature Range: -40°C to 125°C
- Humidity Range: 0% to 100% RH
- Temperature Accuracy: ±0.1°C
- Humidity Accuracy: ±1.5% RH
- Interface: I2C
- Dimensions: 2.5mm x 2.5mm x 0.9mm
SHT41 / SHT41-D / GY-SHT41-D Wiring with ESP32
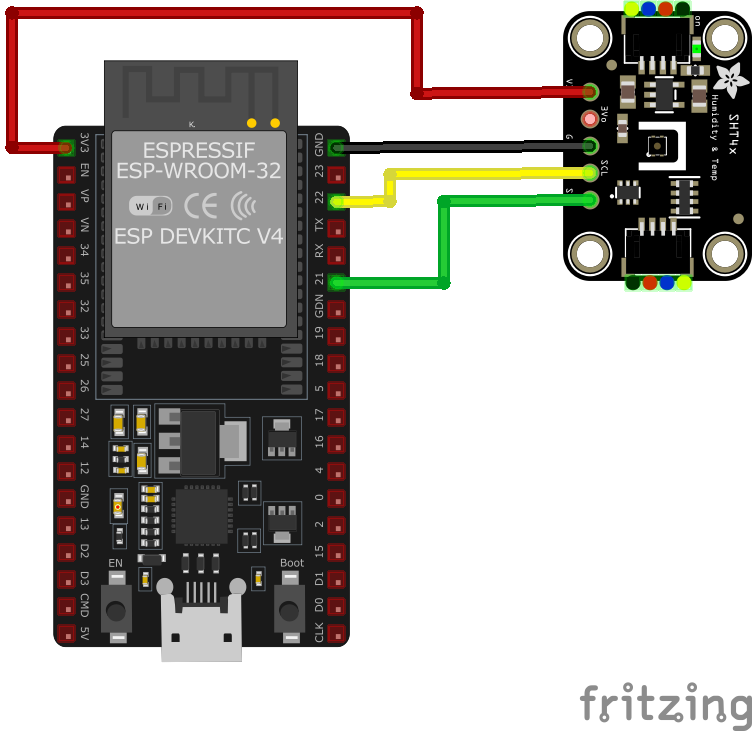
Below you can see the wiring for the SHT41 / SHT41-D / GY-SHT41-D Temperature and Humidity Sensor with the ESP32. Connect the VCC pin of the sensor to the 3.3V pin on the ESP32 or external power supply for power and the GND pin of the sensor to the GND pin of the ESP32. Depending on the communication protocol of the sensor (e.g., I2C, SPI, UART, or analog), connect the appropriate data and clock or signal pins to compatible GPIO pins on the ESP32, as shown below in the wiring diagram.
- Connect VDD to the 3.3V pin on the ESP32.
- Connect GND to the ground (GND) of the ESP32.
- Connect SDA to the ESP32's GPIO21 (default I2C data pin).
- Connect SCL to the ESP32's GPIO22 (default I2C clock pin).
- Place pull-up resistors (10kΩ) between SDA and VDD, and SCL and VDD, to ensure reliable communication.
Code Examples
Below you can find code examples of SHT41 / SHT41-D / GY-SHT41-D Temperature and Humidity Sensor with ESP32 in several frameworks:
If you encounter issues while using the SHT41 / SHT41-D / GY-SHT41-D Temperature and Humidity Sensor, check the Common Issues Troubleshooting Guide.

ESP32 SHT41 / SHT41-D / GY-SHT41-D Arduino IDE Code Example
Fill in your main Arduino IDE sketch file with the following code to use the SHT41 / SHT41-D / GY-SHT41-D Temperature and Humidity Sensor:
#include <Wire.h>
#include "Adafruit_SHT4x.h"

Adafruit_SHT4x sht4;

void setup() {
  Serial.begin(115200);
  if (!sht4.begin()) {
    Serial.println("Couldn't find SHT41 sensor!");
    while (1) delay(10);
  }
  sht4.setPrecision(SHT4X_HIGH_PRECISION);
  Serial.println("SHT41 initialized");
}

void loop() {
  sensors_event_t humidity, temp;
  if (!sht4.getEvent(&humidity, &temp)) {
    Serial.println("Failed to read sensor data");
    return;
  }
  Serial.print("Temperature: "); Serial.print(temp.temperature); Serial.println(" °C");
  Serial.print("Humidity: "); Serial.print(humidity.relative_humidity); Serial.println(" %");
  delay(2000);
}
This Arduino sketch demonstrates how to use the SHT41 sensor with the Adafruit SHT4x library. It initializes the sensor, configures it for high precision, and reads temperature and humidity values every 2 seconds. The readings are printed to the Serial Monitor.
Connect your ESP32 to your computer via a USB cable, Ensure the correct Board and Port are selected under Tools, Click the "Upload" button in the Arduino IDE to compile and upload the code to your ESP32.

ESP32 SHT41 / SHT41-D / GY-SHT41-D ESP-IDF Code ExampleExample in Espressif IoT Framework (ESP-IDF)
If you're using ESP-IDF to work with the SHT41 / SHT41-D / GY-SHT41-D Temperature and Humidity Sensor, here's how you can set it up and read data from the sensor. Fill in this code in the main ESP-IDF file:
#include <stdio.h>
#include "freertos/FreeRTOS.h"
#include "freertos/task.h"
#include "driver/i2c.h"

#define I2C_MASTER_SCL_IO    22    /*!< GPIO number for I2C master clock */
#define I2C_MASTER_SDA_IO    21    /*!< GPIO number for I2C master data */
#define I2C_MASTER_NUM       I2C_NUM_0 /*!< I2C master port */
#define I2C_MASTER_FREQ_HZ   100000     /*!< I2C master clock frequency */
#define SHT41_SENSOR_ADDR    0x44       /*!< SHT41 I2C address */

static esp_err_t i2c_master_init(void) {
    i2c_config_t conf = {
        .mode = I2C_MODE_MASTER,
        .sda_io_num = I2C_MASTER_SDA_IO,
        .scl_io_num = I2C_MASTER_SCL_IO,
        .sda_pullup_en = GPIO_PULLUP_ENABLE,
        .scl_pullup_en = GPIO_PULLUP_ENABLE,
        .master.clk_speed = I2C_MASTER_FREQ_HZ,
    };
    ESP_ERROR_CHECK(i2c_param_config(I2C_MASTER_NUM, &conf));
    return i2c_driver_install(I2C_MASTER_NUM, conf.mode, 0, 0, 0);
}

void read_sht41_sensor() {
    uint8_t data[6];
    uint8_t cmd[] = {0xFD}; // High precision measurement command
    i2c_master_write_to_device(I2C_MASTER_NUM, SHT41_SENSOR_ADDR, cmd, 1, pdMS_TO_TICKS(1000));
    vTaskDelay(pdMS_TO_TICKS(10));
    i2c_master_read_from_device(I2C_MASTER_NUM, SHT41_SENSOR_ADDR, data, 6, pdMS_TO_TICKS(1000));

    uint16_t temp_raw = (data[0] << 8) | data[1];
    uint16_t hum_raw = (data[3] << 8) | data[4];

    float temperature = -45 + 175 * ((float)temp_raw / 65535.0);
    float humidity = 100 * ((float)hum_raw / 65535.0);

    printf("Temperature: %.2f °C, Humidity: %.2f %%\n", temperature, humidity);
}

void app_main() {
    ESP_ERROR_CHECK(i2c_master_init());

    while (1) {
        read_sht41_sensor();
        vTaskDelay(pdMS_TO_TICKS(2000));
    }
}
This ESP-IDF code initializes the I2C master, sends a command to the SHT41 sensor to perform high-precision measurements, reads the raw temperature and humidity data, and converts it into human-readable values. The results are printed every 2 seconds.
Update the I2C pins (I2C_MASTER_SDA_IO and I2C_MASTER_SCL_IO) to match your ESP32 hardware setup, Use idf.py build to compile the project, Use idf.py flash to upload the code to your ESP32.

ESP32 SHT41 / SHT41-D / GY-SHT41-D ESPHome Code Example
Fill in this configuration in your ESPHome YAML configuration file (example.yml) to integrate the SHT41 / SHT41-D / GY-SHT41-D Temperature and Humidity Sensor
sensor:
  - platform: sht4x
    address: 0x44
    temperature:
      name: "Room Temperature"
    humidity:
      name: "Room Humidity"
    update_interval: 60s
This ESPHome configuration defines the SHT41 sensor using the `sht4x` platform. It configures the sensor to read and update temperature and humidity values every 60 seconds, with user-friendly names like 'Room Temperature' and 'Room Humidity.'
Upload this code to your ESP32 using the ESPHome dashboard or the esphome run command.

ESP32 SHT41 / SHT41-D / GY-SHT41-D PlatformIO Code Example
For PlatformIO, make sure to configure the platformio.ini file with the appropriate environment and libraries, and then proceed with the code.
Configure platformio.ini
First, your platformio.ini should look like below. You might need to include some libraries as shown. Make sure to change the board to your ESP32:
[env:esp32dev]
platform = espressif32
board = esp32dev
framework = arduino
lib_deps =
    adafruit/Adafruit SHT4x Library @ ^1.0.0
monitor_speed = 115200
ESP32 SHT41 / SHT41-D / GY-SHT41-D PlatformIO Example Code
Write this code in your PlatformIO project under the src/main.cpp file to use the SHT41 / SHT41-D / GY-SHT41-D Temperature and Humidity Sensor:
#include <Wire.h>
#include "Adafruit_SHT4x.h"

Adafruit_SHT4x sht4;

void setup() {
    Serial.begin(115200);
    if (!sht4.begin()) {
        Serial.println("Couldn't find SHT41 sensor!");
        while (1) delay(10);
    }
    sht4.setPrecision(SHT4X_HIGH_PRECISION);
    Serial.println("SHT41 initialized.");
}

void loop() {
    sensors_event_t temp, humidity;
    if (!sht4.getEvent(&humidity, &temp)) {
        Serial.println("Failed to read sensor data");
        return;
    }
    Serial.print("Temperature: ");
    Serial.print(temp.temperature);
    Serial.println(" °C");
    Serial.print("Humidity: ");
    Serial.print(humidity.relative_humidity);
    Serial.println(" %");
    delay(2000);
}
This PlatformIO code uses the Adafruit SHT4x library to interface with the SHT41 sensor. The sensor is initialized in high-precision mode, and temperature and humidity readings are obtained and printed every 2 seconds.
Upload the code to your ESP32 using the PlatformIO "Upload" button in your IDE or the pio run --target upload command.
ESP32 SHT41 / SHT41-D / GY-SHT41-D MicroPython Code Example
Fill in this script in your MicroPython main.py file (main.py) to integrate the SHT41 / SHT41-D / GY-SHT41-D Temperature and Humidity Sensor with your ESP32.
from machine import I2C, Pin
from time import sleep

# Initialize I2C interface
i2c = I2C(0, scl=Pin(22), sda=Pin(21))

# SHT41 I2C address
SHT41_ADDR = 0x44

# Command for high-precision measurement
MEASURE_CMD = b'\xFD'

while True:
    try:
        i2c.writeto(SHT41_ADDR, MEASURE_CMD)
        sleep(0.01)  # Wait for measurement to complete
        data = i2c.readfrom(SHT41_ADDR, 6)
        raw_temp = (data[0] << 8) | data[1]
        raw_hum = (data[3] << 8) | data[4]
        temperature = -45 + 175 * (raw_temp / 65535.0)
        humidity = 100 * (raw_hum / 65535.0)
        print("Temperature: {:.2f} °C".format(temperature))
        print("Humidity: {:.2f} %".format(humidity))
    except Exception as e:
        print("Error reading SHT41: ", e)
    sleep(2)
This MicroPython script interfaces with the SHT41 sensor using I2C. It sends a command for high-precision measurement, reads the raw data, processes it, and prints the temperature and humidity values every 2 seconds.
Upload this code to your ESP32 using a MicroPython-compatible IDE, such as Thonny, uPyCraft, or tools like ampy.
SHT41 / SHT41-D / GY-SHT41-D Temperature and Humidity Sensor Troubleshooting
This guide outlines a systematic approach to troubleshoot and resolve common problems with the . Start by confirming that the hardware connections are correct, as wiring mistakes are the most frequent cause of issues. If you are sure the connections are correct, follow the below steps to debug common issues.
Intermittent Sensor Functionality on ESP32
Issue: The SHT41 sensor exhibits unreliable behavior when connected to an ESP32. Some sensors function without issues, while others intermittently stop working or cause the ESP32 to freeze. The error message observed is: Recovery failed: SCL is held LOW on the i2c.
Possible causes include insufficient pull-up resistors on the I2C lines, leading to communication instability.
Solution: Ensure that appropriate pull-up resistors are present on the SDA and SCL lines. If the sensor board lacks built-in pull-ups, add external resistors (typically 4.7kΩ to 10kΩ) to stabilize the I2C communication. Additionally, verify that the power supply is stable and that all connections are secure. (forum.arduino.cc)
Inaccurate Temperature Readings Due to Self-Heating
Issue: The SHT41 sensor reports temperature readings higher than the actual ambient temperature. This discrepancy is often due to self-heating caused by nearby components on the PCB, such as microcontrollers, voltage regulators, or LEDs.
Possible causes include heat generated by adjacent components affecting the sensor's measurements.
Solution: To minimize self-heating effects, consider the following approaches:
- Isolate the sensor from heat-generating components by placing it on a separate PCB or using physical barriers.
- Implement duty-cycling in your code to reduce the sensor's active time, thereby decreasing heat accumulation.
- Ensure adequate ventilation around the sensor to dissipate heat effectively.
Communication Error: OSError: [Errno 19] ENODEV
Issue: When attempting to read data from the SHT41 sensor using an ESP32 with MicroPython, the following error occurs: OSError: [Errno 19] ENODEV. This error arises during the I2C read operation, despite the sensor being detected at address 0x44 during scanning.
Possible causes include improper I2C communication sequences or timing issues.
Solution: Implement a soft reset of the sensor before initiating data reads. This can be achieved by sending the appropriate reset command as specified in the sensor's datasheet. Additionally, ensure that the I2C communication follows the correct sequence and adheres to the timing requirements outlined by the manufacturer. (github.com)
Incorrect Readings on SHT4x Smart Gadget
Issue: When using the SHT4x Smart Gadget to read data from an external SHT41-AD1B sensor, the display shows values like 3.0 for temperature and 0.1 for humidity, which are incorrect.
Possible causes include improper connection or configuration of the external sensor.
Solution: Verify that the external sensor is correctly connected to the Smart Gadget, ensuring proper alignment and secure connections. Consult the Smart Gadget's user manual to confirm that it supports the specific sensor model and that any necessary configuration settings are correctly applied. (forum.digikey.com)
Conclusion
We went through technical specifications of SHT41 / SHT41-D / GY-SHT41-D Temperature and Humidity Sensor, its pinout, connection with ESP32 and SHT41 / SHT41-D / GY-SHT41-D Temperature and Humidity Sensor code examples with Arduino IDE, ESP-IDF, ESPHome and PlatformIO.

